この記事のゴール
- Laravel でのテスト駆動開発についてわかる
※テスト駆動開発についてはこの辺りの記事が参考になると思います。

前提条件
- Laravel での自動テストの仕方について理解している。
※まだの場合は以前の記事を参考にしてください。
これからやること
- 機能仕様の確認
- テストコード作成
- テスト実行1回目:レッドフェーズ
- マイグレーション、ファクトリー、モデル作成
- マイグレーション実行:開発環境、テスト環境
- コントローラー作成
- ルーティング
- テスト実行2回目:グリーンフェーズ
- リファクタリング:コントローラー修正
- リファクタリング:Bladeテンプレート作成
- テスト実行3回目
機能仕様の確認
TODOは前回作ってしまったので、似た機能のメモ帳でも作りますか。
テスト駆動開発の確認用なので簡単で雑な作りにします。(TODOより簡素)
1.メモ一覧表示機能
・URL: /memo
・ページタイトル:メモ帖
・レコード全件表示(ここが一番雑。)
・レコードが無い場合:「メモはありません。」を表示
・表示項目:メモの内容
・新規登録の入力欄:メモの内容、登録ボタン
・バリデーションエラー時:エラー表示、入力内容表示
・削除のリンク
2.メモ新規登録機能:
・URL: /memo/create
・バリデーション:
・メモの内容:必須、文字列、最大80文字
・レコード登録後に一覧表示にリダイレクト
3.メモ削除機能:
・URL: /memo/destroy
・指定IDのレコード削除
・レコード削除後に一覧表示にリダイレクト
テストコード作成
php artisan make:test MemoTest
上記の機能仕様をよく確認しながらテストコードを先に組んでいきます。
筆者の場合は、先にスケルトン的なものを作ってしまいます。
<?php

namespace Tests\Feature;

use Illuminate\Foundation\Testing\RefreshDatabase;
use Illuminate\Foundation\Testing\WithFaker;
use Tests\TestCase;
use App\Models\Memo;

class MemoTest extends TestCase
{
    public function test_index_can_be_rendered(): void
    {

    }

    public function test_create_can_create(): void
    {

    }

    public function test_destroy_can_destroy(): void
    {

    }
}
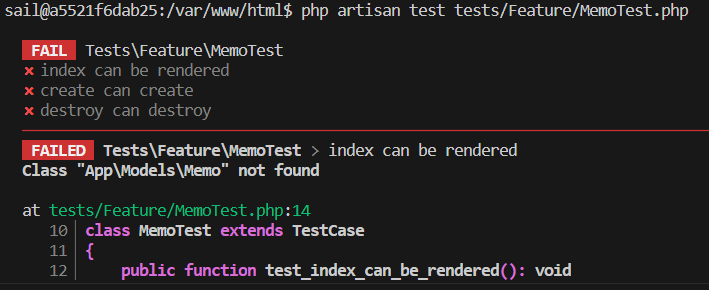
この状態だと、当然こうなります。
こうすることで、テストコードの残りが明確になるので、
あとは空白を埋めるべく最速で頑張るだけです。
<?php

namespace Tests\Feature;

use Illuminate\Foundation\Testing\RefreshDatabase;
use Illuminate\Foundation\Testing\WithFaker;
use Tests\TestCase;
use App\Models\Memo;

class MemoTest extends TestCase
{
    public function test_index_can_be_rendered(): void
    {
        $memoes = Memo::factory()->count(5)->create();
        $response = $this->get(route('memo.index'))
                         ->assertSee('メモ帖')
                         ->assertSee('新規登録')
                         ->assertSee('メモ')
                         ->assertSee('登録')
                         ->assertSee('削除')
                         ->assertOk();
        foreach ($memoes as $index => $memo) {
            $response->assertSee($memo->memo);
        }
        Memo::truncate();
        $this->get(route('memo.index'))
             ->assertSee('メモはありません。')
             ->assertOk();
    }

    public function test_create_can_create(): void
    {
        $memo = Memo::factory()->definition();
        $this->post(route('memo.store'), ['memo' => $memo['memo']])
             ->assertValid()
             ->assertRedirect(route('memo.index'));
        $this->get(route('memo.index'))
             ->assertSee($memo['memo'])
             ->assertOk();
    }

    public function test_destroy_can_destroy(): void
    {
        Memo::truncate();
        Memo::factory()->count(5)->create();
        $id = 3;
        $this->delete(route('memo.destroy', ['id' => $id]))
             ->assertRedirect(route('memo.index'));
        $memoes = Memo::all();
        foreach ($memoes as $memo) {
            $this->assertTrue($memo->id !== $id);
        }
    }
}
はい、一旦できました。こんな感じでしょうか。
テスト実行1回目:レッドフェーズ
では、REDフェーズなので、失敗するためのテスト実行をします。
php artisan test tests/Feature/MemoTest.php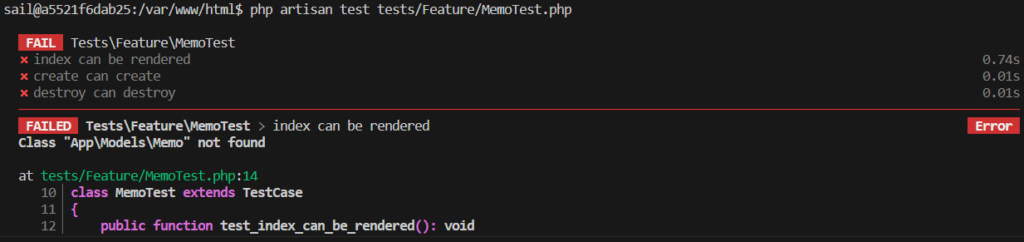
はい、当然真っ赤です。では、最速でグリーンになるようにしていきましょう。
マイグレーション、ファクトリー、モデル作成
では一気に作ります。今回、シーダーは作りません。まずはマイグレーションから。
php artisan make:migration create_memoes_table<?php
use Illuminate\Database\Migrations\Migration;
use Illuminate\Database\Schema\Blueprint;
use Illuminate\Support\Facades\Schema;
return new class extends Migration
{
/**
* Run the migrations.
*/
public function up(): void
{
Schema::create('memoes', function (Blueprint $table) {
$table->id();
$table->string('memo', 80);
$table->timestamps();
});
}
/**
* Reverse the migrations.
*/
public function down(): void
{
Schema::dropIfExists('memoes');
}
};
次にファクトリーを作ります。
php artisan make:factory MemoFactory<?php
namespace Database\Factories;
use Illuminate\Database\Eloquent\Factories\Factory;
/**
* @extends \Illuminate\Database\Eloquent\Factories\Factory<\App\Models\Model>
*/
class MemoFactory extends Factory
{
/**
* Define the model's default state.
*
* @return array<string, mixed>
*/
public function definition(): array
{
return [
'memo' => fake()->text(80),
];
}
}
次にモデルを作成します。
php artisan make:model Memo<?php
namespace App\Models;
use Illuminate\Database\Eloquent\Factories\HasFactory;
use Illuminate\Database\Eloquent\Model;
class Memo extends Model
{
protected $table = 'memoes';
public static $rules = [
'memo' => 'required|string|max:80',
];
protected $fillable = [
'memo',
];
use HasFactory;
}
$table = ‘memoes’ を指定しておかないと、エラーになります。
モデル名が「Memo」だと、memos テーブルに対して操作をしてしまいます。
この辺は英語の文法に従わないようです。
マイグレーション実行:開発環境、テスト環境
php artisan migrate
無事テーブルが作成されました。テスト環境も忘れずにマイグレーション実行します。
php artisan migrate --env=testingコントローラー作成
次はコントローラーを作成します。
php artisan make:controller MemoController<?php
namespace App\Http\Controllers;
use Illuminate\Http\Request;
use App\Models\Memo;
class MemoController extends Controller
{
public function index()
{
$memoes = Memo::all();
$list = "";
foreach ($memoes as $memo) {
$list .= $memo->memo . "\n";
}
return "メモ帖,新規登録,件名,内容,登録,削除,メモはありません。\n" . $list;
}
public function store(Request $request)
{
$this->validate($request, Memo::$rules);
$memo = new Memo();
$memo->fill($request->except('_token'))->save();
return redirect(route('memo.index'));
}
public function destroy($id)
{
$memo = Memo::findOrFail($id);
$memo->delete();
return redirect(route('memo.index'));
}
}
ルーティング
[route/web.php] の use 宣言の部分に追記します。
use App\Http\Controllers\MemoController;
ルーティングを追記します。
Route::prefix('/memo')->name('memo.')->group(function () {
    Route::get('/', [MemoController::class, 'index'])->name('index');
    Route::post('/store', [MemoController::class, 'store'])->name('store');
    Route::delete('/destroy/{id}', [MemoController::class, 'destroy'])->whereNumber('id')->name('destroy');
});
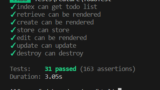
テスト実行2回目:グリーンフェーズ
php artisan test tests/Feature/MemoTest.php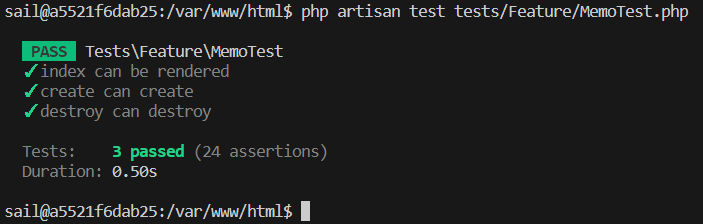
はい、とりあえずオールグリーンです。
どんな方法でも良いので、まずは最速でここを目指しましょう。
Laravel の場合はコントローラーやモデル等で記述する内容が少ないので対応しやすいです。
では、リファクタリングを進めていきましょう。
リファクタリング:コントローラー修正
index() メソッドが酷い有様なので修正します。
<?php

namespace App\Http\Controllers;

use Illuminate\Http\Request;
use App\Models\Memo;

class MemoController extends Controller
{
    public function index()
    {
        return view('memo.index', [
            'pageTitle' => 'メモ帖',
            'memoes' => Memo::all(),
        ]);
    }

    public function store(Request $request)
    {
        $this->validate($request, Memo::$rules);
        $memo = new Memo();
        $memo->fill($request->except('_token'))->save();
        return redirect(route('memo.index'));
    }

    public function destroy($id)
    {
        $memo = Memo::findOrFail($id);
        $memo->delete();
        return redirect(route('memo.index'));
    }
}
リファクタリング:Bladeテンプレート作成
フォルダ [resources/views/memo/] を作成し、その中に [index.blade.php] を作成します。
<!DOCTYPE html>
<html>
    <head>
        <meta charset="utf-8">
        <title>{{$pageTitle}}</title>
    </head>
    <body>
        <h1>{{$pageTitle}}</h1>
        <h2>新規登録</h2>
        <form method="POST" action="{{route('memo.store')}}">
            @csrf
            <label>メモ:</label>
            <input type="text" name="memo" size="80" maxlength="80"
                value="{{old('memo')}}"
                class="@error('memo') error-input @enderror"
            />
            <button type="submit">登録</button>
            @error('memo') <div class="error-message">{{$message}}</div> @enderror
        </form>
        <h2>メモ一覧</h2>
        <p>
            @isset($memoes)
                @if(count($memoes))
                {{count($memoes)}} 件
                <ol>
                    @foreach($memoes as $memo)
                    <li>
                        {{$memo->memo}}
                        <form method="POST" action="{{route('memo.destroy', ['id' => $memo->id])}}"
                            onClick="event.preventDefault();this.closest('form').submit()"
                            style="display:inline"
                        >
                            @csrf
                            @method('delete')
                            <a href="">[削除]</a>
                        </form>
                    </li>
                    @endforeach
                </ol>
                @else
                メモはありません。
                @endif
            @else
            メモはありません。
            @endisset
        </p>
    </body>
</html>
テスト実行3回目
php artisan test tests/Feature/MemoTest.php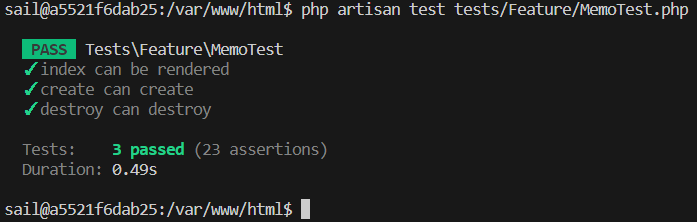
オールグリーン。これで安心して眠れます。
でも、実は機能仕様の全てをテストに盛り込んでいないので、
そこは後でテストに実装する必要があります。
レビューなどがしっかりある現場ならレビュアーがキッチリ指摘してくれます。
まとめ
- 機能仕様をよく確認する。
- テストコードを真っ先に書く
- 失敗するためのテストを実行する
- 成功するために最速で実装を進める
- 成功するためのテストを実行する
- リファクタリングを進める
Laravel だと工数が少なくて済みますね。
以上、お疲れ様でした。
- 0
- 0
- 0
- 0

コメント