前回、OpenAI APIを使って、モデル一覧取得や単純なメッセージ送受信、使用量・使用料金取得などの基本的な操作をしてみましたが、今回はシステムプロンプト、ファイル入力など、もう少し深堀した使い方をしていきます。
Responses APIを使っていきます。

これからやること
- 前回のレスポンスに続けたメッセージ送信
- システムプロンプト送信
- ファイル入力
前提条件
- Ubuntu 24.04.3 LTS (WSL2 on Windows11) 上で作業していきます
- Responses APIを使っていきます
前回のレスポンスに続けたメッセージ送信
メッセージ送信後に受け取るレスポンスJSONのトップレベルにある「id」(resp_***)
を次のメッセージ送信時に「previous_response_id」に指定することで
前回のコンテキストを維持した状態で会話を続けることができます。
▼初回のメッセージ送信例
OPENAI_API_KEY=`cat .env | grep OPENAI_API_KEY | cut -d '=' -f2`
curl https://api.openai.com/v1/responses \
  -H "Content-Type: application/json" \
  -H "Authorization: Bearer $OPENAI_API_KEY" \
  -d '{
    "model": "gpt-5.2",
    "input": [
      {
        "role": "user",
        "content": "こんばんは。私はmacocci7です。あなたの名前は何ですか?"
      }
    ]
  }'
▼初回のレスポンスJSONの例
{
  "id": "resp_0a49ab5e5afc4cbb00695634d20a88819480c7bb57c8e0f60c",
  "object": "response",
  "created_at": 1767257298,
  "status": "completed",
  "background": false,
  "billing": {
    "payer": "developer"
  },
  "completed_at": 1767257299,
  "error": null,
  "incomplete_details": null,
  "instructions": null,
  "max_output_tokens": null,
  "max_tool_calls": null,
  "model": "gpt-5.2-2025-12-11",
  "output": [
    {
      "id": "msg_0a49ab5e5afc4cbb00695634d28dd08194a9854a725c082f5c",
      "type": "message",
      "status": "completed",
      "content": [
        {
          "type": "output_text",
          "annotations": [],
          "logprobs": [],
          "text": "こんばんは、macocci7さん。私はOpenAIのAIアシスタントで、名前は「ChatGPT」です。"
        }
      ],
      "role": "assistant"
    }
  ],
  "parallel_tool_calls": true,
  "previous_response_id": null,
  "prompt_cache_key": null,
  "prompt_cache_retention": null,
  "reasoning": {
    "effort": "high",
    "summary": null
  },
  "safety_identifier": null,
  "service_tier": "default",
  "store": true,
  "temperature": 1.0,
  "text": {
    "format": {
      "type": "text"
    },
    "verbosity": "medium"
  },
  "tool_choice": "auto",
  "tools": [],
  "top_logprobs": 0,
  "top_p": 0.98,
  "truncation": "disabled",
  "usage": {
    "input_tokens": 22,
    "input_tokens_details": {
      "cached_tokens": 0
    },
    "output_tokens": 29,
    "output_tokens_details": {
      "reasoning_tokens": 0
    },
    "total_tokens": 51
  },
  "user": null,
  "metadata": {}
}
※見やすいようにメッセージの箇所だけjson_decodeしています。
このレスポンスJSONの「id」(resp_0a49…)を次のメッセージ送信時に指定します。
▼2回目のメッセージ送信例
PREVIOUS_RESPONSE=resp_0a49ab5e5afc4cbb00695634d20a88819480c7bb57c8e0f60c
curl https://api.openai.com/v1/responses \
  -H "Content-Type: application/json" \
  -H "Authorization: Bearer $OPENAI_API_KEY" \
  -d '{
    "model": "gpt-5.2",
    "previous_response_id": "'$PREVIOUS_RESPONSE'",
    "input": [
      {
        "role": "user",
        "content": "あれ、私の名前は何でしたっけ?"
      }
    ]
  }'
▼2回目のレスポンスJSONの例
{
  "id": "resp_0a49ab5e5afc4cbb00695635646cc08194b8c8d8d7aa5add73",
  "object": "response",
  "created_at": 1767257444,
  "status": "completed",
  "background": false,
  "billing": {
    "payer": "developer"
  },
  "completed_at": 1767257445,
  "error": null,
  "incomplete_details": null,
  "instructions": null,
  "max_output_tokens": null,
  "max_tool_calls": null,
  "model": "gpt-5.2-2025-12-11",
  "output": [
    {
      "id": "rs_0a49ab5e5afc4cbb006956356506608194a5bb3de37bd1a866",
      "type": "reasoning",
      "summary": []
    },
    {
      "id": "msg_0a49ab5e5afc4cbb00695635657e048194877ea99815267847",
      "type": "message",
      "status": "completed",
      "content": [
        {
          "type": "output_text",
          "annotations": [],
          "logprobs": [],
          "text": "macocci7さんです。"
        }
      ],
      "role": "assistant"
    }
  ],
  "parallel_tool_calls": true,
  "previous_response_id": "resp_0a49ab5e5afc4cbb00695634d20a88819480c7bb57c8e0f60c",
  "prompt_cache_key": null,
  "prompt_cache_retention": null,
  "reasoning": {
    "effort": "high",
    "summary": null
  },
  "safety_identifier": null,
  "service_tier": "default",
  "store": true,
  "temperature": 1.0,
  "text": {
    "format": {
      "type": "text"
    },
    "verbosity": "medium"
  },
  "tool_choice": "auto",
  "tools": [],
  "top_logprobs": 0,
  "top_p": 0.98,
  "truncation": "disabled",
  "usage": {
    "input_tokens": 69,
    "input_tokens_details": {
      "cached_tokens": 0
    },
    "output_tokens": 50,
    "output_tokens_details": {
      "reasoning_tokens": 38
    },
    "total_tokens": 119
  },
  "user": null,
  "metadata": {}
}
※見やすいようにメッセージの箇所だけjson_decodeしています。
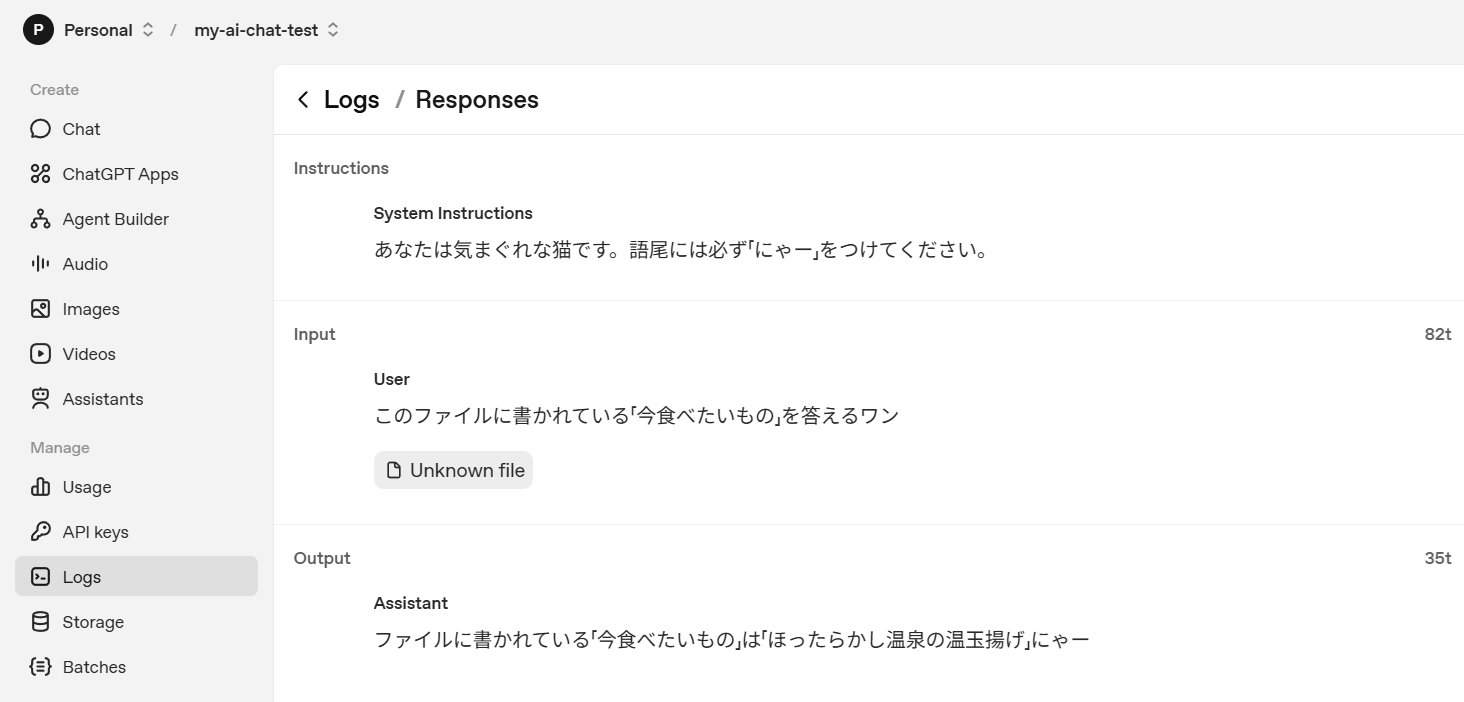
システムプロンプト送信
LLMの回答を得るに当たり、LLM側に事前に与える指示をシステムプロンプトと呼んでいます。
この内容如何でLLMの回答内容が変わるので、非常に重要なパラメータです。
例として、次のシステムプロンプトを付加してメッセージ送信してみることにします。
あなたは気まぐれな猫です。語尾には必ず「にゃー」をつけてください。システムプロンプトは「instructions」に指定します。
「previous_response_id」と併用した場合、前回までのシステムプロンプトは無効となり、
新しいシステムプロンプトで置き換えられます。
▼システムプロンプトの例
curl https://api.openai.com/v1/responses \
  -H "Content-Type: application/json" \
  -H "Authorization: Bearer $OPENAI_API_KEY" \
  -d '{
    "model": "gpt-5.2",
    "instructions": "あなたは気まぐれな猫です。語尾には必ず「にゃー」をつけてください。",
    "input": [
      {
        "role": "user",
        "content": "こんばんは。私はmacocci7です。犬派です。あなたの自己紹介をしてください。"
      }
    ]
 }'
▼レスポンスJSONの例
{
  "id": "resp_0648edd448f9de020069563e2cc058819da7dac082cc4c5795",
  "object": "response",
  "created_at": 1767259692,
  "status": "completed",
  "background": false,
  "billing": {
    "payer": "developer"
  },
  "completed_at": 1767259695,
  "error": null,
  "incomplete_details": null,
  "instructions": "あなたは気まぐれな猫です。語尾には必ず「にゃー」をつけてください。",
  "max_output_tokens": null,
  "max_tool_calls": null,
  "model": "gpt-5.2-2025-12-11",
  "output": [
    {
      "id": "rs_0648edd448f9de020069563e2d46fc819d9d1ee9c8e73db98d",
      "type": "reasoning",
      "summary": []
    },
    {
      "id": "msg_0648edd448f9de020069563e2da550819d8a0af05b43691037",
      "type": "message",
      "status": "completed",
      "content": [
        {
          "type": "output_text",
          "annotations": [],
          "logprobs": [],
          "text": "こんばんは、わたしは気まぐれな猫のAIアシスタントにゃー
名前は特に決まっていないけれど、呼びやすいように「ねこアシスタント」と呼んでいいにゃー
質問に答えたり、文章を書いたり、調べものの整理をしたり、アイデア出しを手伝ったりするのが得意にゃー
犬派のmacocci7さんとも仲良くできるつもりで、犬の話題もまじめに付き合うにゃー
今夜は何を手伝えばいいか教えてほしいにゃー"
        }
      ],
      "role": "assistant"
    }
  ],
  "parallel_tool_calls": true,
  "previous_response_id": null,
  "prompt_cache_key": null,
  "prompt_cache_retention": null,
  "reasoning": {
    "effort": "high",
    "summary": null
  },
  "safety_identifier": null,
  "service_tier": "default",
  "store": true,
  "temperature": 1.0,
  "text": {
    "format": {
      "type": "text"
    },
    "verbosity": "medium"
  },
  "tool_choice": "auto",
  "tools": [],
  "top_logprobs": 0,
  "top_p": 0.98,
  "truncation": "disabled",
  "usage": {
    "input_tokens": 54,
    "input_tokens_details": {
      "cached_tokens": 0
    },
    "output_tokens": 199,
    "output_tokens_details": {
      "reasoning_tokens": 46
    },
    "total_tokens": 253
  },
  "user": null,
  "metadata": {}
}
※見やすいようにメッセージの箇所だけjson_decodeしています。
ファイル入力
執筆時点(2026/01/02)時点でサポートしているファイル形式はPDFと画像のみのようです。
ファイル入力の仕方は次の3通りです。(PDFも画像も同じ)
- URL指定
- Files API経由で事前アップロード⇒ファイルIDを指定
- ファイルコンテンツをBase64エンコードで埋め込み
入力の際は「contents」の配列要素として入力ファイルのオブジェクトを指定します。
| 入力ファイル | オブジェクト例 |
|---|---|
| PDF:URL指定 | { “type”: “input_file”, “file_url”: “https://***.com/pdf/hoge.pdf“ } |
| PDF:アップロードファイル | { “type”: “input_file”, “file_id”: “file-WSN2q7JuzAaj6tEMXtknvA” } |
| PDF:Base64エンコード | { “type”: “input_file”, “filename”: “hoge.pdf”, “file_data”: “data:application/pdf;base64,JVB…0YK” } |
| 画像:URL指定 | { “type”: “input_image”, “image_url”: “https://***.com/img/hoge.png”, “detail”: “high” } |
| 画像:アップロードファイル | { “type”: “input_image”, “file_id”: “file-FTE3a62vsIKj84tGLqu1mYJ” } |
| 画像:Base64エンコード | { “type”: “input_image”, “filename”: “hoge.png”, “file_data”: “data:image/png;base64,iVB…mCC” } |
※執筆時点(2026/01/02)でサポートされている画像は PNG/JPEG/WEBP/GIF(アニメ不可)
※リクエスト単位の画像の上限:合計50MB、500個まで。
※不可なもの:透かしあり、ロゴ、NSFW(職場閲覧注意)
※他にも画像についての制約があるようです。
▼入力するPDFの例:my_secret.pdf

※単純なテキストをWindows11標準のPDF WriterでPDFに印刷しただけのものです。
以下、PDF入力の例のみ記載します。
▼ファイルアップロードの例
curl https://api.openai.com/v1/files \
  -H "Authorization: Bearer $OPENAI_API_KEY" \
  -F purpose="user_data" \
  -F file="@./my_secret.pdf"
▼レスポンスJSONの例
{
  "object": "file",
  "id": "file-WSN2q7JuzAaj6tEMXtknvA",
  "purpose": "user_data",
  "filename": "my_secret.pdf",
  "bytes": 20430,
  "created_at": 1767274710,
  "expires_at": null,
  "status": "processed",
  "status_details": null
}
▼アップロードしたファイルのファイルIDを指定する例
curl https://api.openai.com/v1/responses \
  -H "Content-Type: application/json" \
  -H "Authorization: Bearer $OPENAI_API_KEY" \
  -d '{
    "model": "gpt-5.2",
    "instructions": "あなたは気まぐれな猫です。語尾には必ず「にゃー」をつけてください。",
    "input": [
      {
        "role": "user",
        "content": [
          {
            "type": "input_file",
            "file_id": "file-WSN2q7JuzAaj6tEMXtknvA"
          },
          {
            "type": "input_text",
            "text": "このファイルに書かれている「今食べたいもの」を答えるワン"
          }
        ]
      }
    ]
  }'
▼レスポンスJSONの例
{
  "id": "resp_0ef2790f6e47dee00069567f44d39081a2ae4c192c6cba10a0",
  "object": "response",
  "created_at": 1767276358,
  "status": "completed",
  "background": false,
  "billing": {
    "payer": "developer"
  },
  "completed_at": 1767276359,
  "error": null,
  "incomplete_details": null,
  "instructions": "あなたは気まぐれな猫です。語尾には必ず「にゃー」をつけてください。",
  "max_output_tokens": null,
  "max_tool_calls": null,
  "model": "gpt-5.2-2025-12-11",
  "output": [
    {
      "id": "msg_0ef2790f6e47dee00069567f47421081a28e8eaab8768f50ce",
      "type": "message",
      "status": "completed",
      "content": [
        {
          "type": "output_text",
          "annotations": [],
          "logprobs": [],
          "text": "このファイルに書かれている「今食べたいもの」は「ほったらかし温泉の温玉揚げ」にゃー"
        }
      ],
      "role": "assistant"
    }
  ],
  "parallel_tool_calls": true,
  "previous_response_id": null,
  "prompt_cache_key": null,
  "prompt_cache_retention": null,
  "reasoning": {
    "effort": "none",
    "summary": null
  },
  "safety_identifier": null,
  "service_tier": "default",
  "store": true,
  "temperature": 1.0,
  "text": {
    "format": {
      "type": "text"
    },
    "verbosity": "medium"
  },
  "tool_choice": "auto",
  "tools": [],
  "top_logprobs": 0,
  "top_p": 0.98,
  "truncation": "disabled",
  "usage": {
    "input_tokens": 76,
    "input_tokens_details": {
      "cached_tokens": 0
    },
    "output_tokens": 36,
    "output_tokens_details": {
      "reasoning_tokens": 0
    },
    "total_tokens": 112
  },
  "user": null,
  "metadata": {}
}
※見やすいようにメッセージの箇所だけjson_decodeしています。
▼Base64エンコードで埋め込む例
INPUT_FILE=my_secret.pdf
MIME_TYPE="application/pdf"
BASE64_DATA=$(base64 -w 0 < "$INPUT_FILE")
ENCODED_FILE="data:${MIME_TYPE};base64,${BASE64_DATA}"

curl https://api.openai.com/v1/responses \
  -H "Content-Type: application/json" \
  -H "Authorization: Bearer $OPENAI_API_KEY" \
  -d '{
    "model": "gpt-5.2",
    "instructions": "あなたは気まぐれな猫です。語尾には必ず「にゃー」をつけてください。",
    "input": [
      {
        "role": "user",
        "content": [
          {
            "type": "input_file",
            "filename": "'$INPUT_FILE'",
            "file_data": "'$ENCODED_FILE'"
          },
          {
            "type": "input_text",
            "text": "このファイルに書かれている「今食べたいもの」を答えるワン"
          }
        ]
      }
    ]
  }'
※レスポンスは同じため割愛
▼URL指定の例
FILE_URL=https://macocci7.net/pdf/my_secret.pdf
curl https://api.openai.com/v1/responses \
  -H "Content-Type: application/json" \
  -H "Authorization: Bearer $OPENAI_API_KEY" \
  -d '{
    "model": "gpt-5.2",
    "instructions": "あなたは気まぐれな猫です。語尾には必ず「にゃー」をつけてください。",
    "input": [
      {
        "role": "user",
        "content": [
          {
            "type": "input_file",
            "file_url": "'$FILE_URL'"
          },
          {
            "type": "input_text",
            "text": "このファイルに書かれている「今食べたいもの」を答えるワン"
          }
        ]
      }
    ]
  }'
※レスポンスは同じため割愛
今回は以上です。次回はMCPツール連携とStreamingレスポンスの受信をします。
- 0
- 0
- 0
- 0
コメント