Docker Desktopと異なり、PodmanではWSL2上の別ディストリビューション(Ubuntu等)のファイルシステムをPodman Machine側でマウントする機能が現時点ではありません。(Windows側のファイルシステムはマウントされる)
WSL2のディストリビューションUbuntu24.04のファイルシステムを、別ディストリビューションのPodman Machine側でマウントする設定のメモです。
何通りか考えられる内、今回は一番手っ取り早そうなネットワークドライブ経由でマウントする方法を試してみました。
結論から
ネットワークドライブのマウントはお勧めしません。他の方法を試すべきでしょう。
ネットワークドライブをマウントするメリットとデメリット:
▼メリット1:設定が楽。
▼メリット2:一応、コンテナへのマウント可。
▼デメリット1:ディスクI/Oの遅さがボトルネック。
LaravelやPHPUnit等、1回の実行で多数のファイルを読み込む処理には向いていません。
php artisan –version
の実行だけで20秒~30秒掛かり、WEBアクセスも同じく悶絶もの。。残念!
数個程度のファイルを読み書きする程度なら気になりません。
▼デメリット2:すべてのファイル・ディレクトリが
パーミッション: ファイルは 666、ディレクトリは 777
オーナーもパーミッションも変更不可
chown や chmod は実行できるが、長時間待ちの上、効果なし。
ということで、「それでもやりたいんです!」というMなあなたに朗報です。
一応やり方は記しておきます。
前提条件
- Podman DesktopをWindows11にインストール済
- Podman MachineをPodman Desktop側で作成済(デフォルト設定)
- Ubuntu24.04がWSL2のディストリビューションとして存在
- Ubuntu24.04(WSL2)にPodman Remoteインストール&設定済
やることの概要
- Ubuntuのルートディレクトリをネットワークドライブに割り当て
- Podman Machine上にマウントポイント作成
- Podman Machine側でネットワークドライブを手動マウント
- 自動マウント設定
- シンボリックリンク作成
- 動作確認で悶絶
ネットワークドライブの割り当て
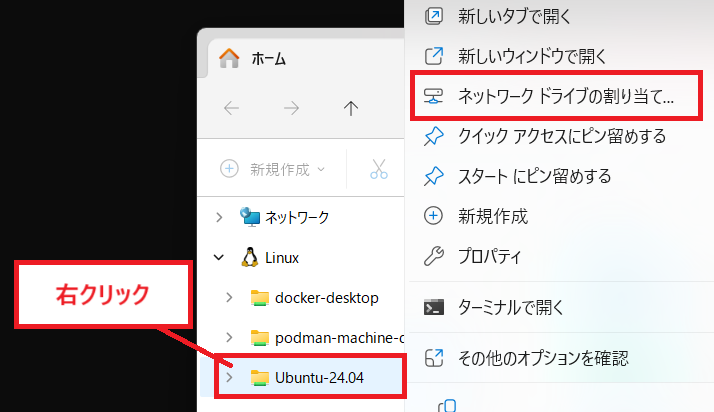
エクスプローラの「Linux」の中にある「Ubuntu-24.04」を右クリックして、「ネットワークドライブの割り当て」を選択。
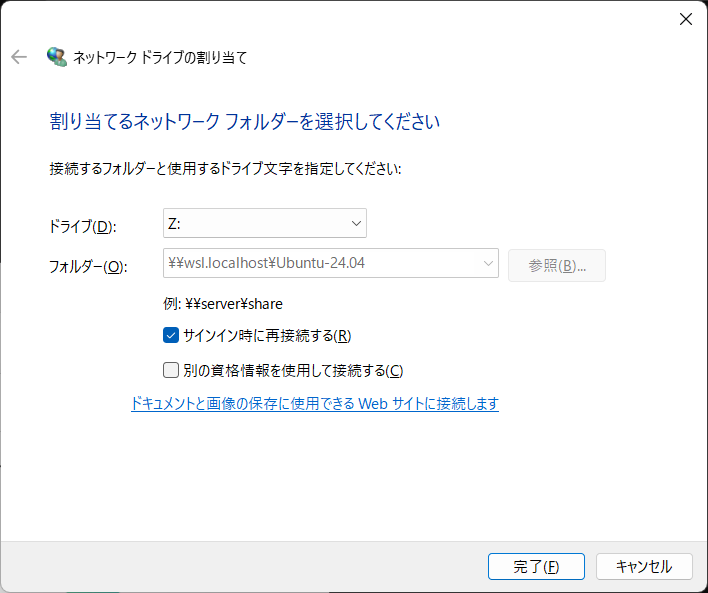
ドライブを指定して(ここでは Z )「完了」ボタン押下。
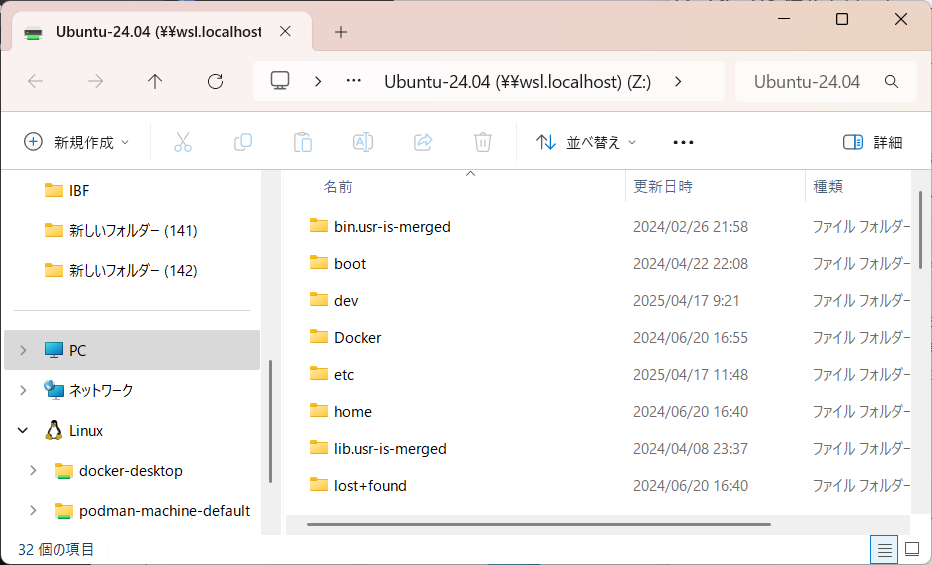
割り当てしたネットワークドライブ(Z)が開くので確認。
root権限でアクセスしているのと同等なので、消さないように注意!!
マウントポイント作成
Podman Machineのターミナルを開き、
マウント先のディレクトリを作成します。
sudo mkdir /mnt/z手動マウント
Podman Machineのターミナルで手動でマウントしてみます。
[user@podman-machine-default ~]$ sudo mount -t drvfs z: /mnt/z/
<3>WSL (20709 - ) ERROR: UtilGetPpid:1279: Failed to parse: /proc/20287/stat, content: 20287 (su) S 0 0 0 34821 20705 4194560 531 0 2 0 0 0 0 0 20 0 1 0 1046516 13815808 1654 18446744073709551615 94265176428544 94265176456481 140733114451600 0 0 0 2147196671 0 16384 1 0 0 17 14 0 0 0 0 0 94265176479632 94265176481796 94265595781120 140733114455798 140733114455809 140733114455809 140733114458092 0
[user@podman-machine-default ~]$
エラーが出ますが、一応マウントはされます。
[user@podman-machine-default ~]$ df -h
df: /proc/sys/fs/binfmt_misc: Too many levels of symbolic links
Filesystem      Size  Used Avail Use% Mounted on
/dev/sdd       1007G  2.0G  954G   1% /
rootfs          3.8G  2.4M  3.8G   1% /init
none            3.8G     0  3.8G   0% /dev
none            3.8G   84K  3.8G   1% /dev/shm
tmpfs           4.0M     0  4.0M   0% /sys/fs/cgroup
none            3.8G  636K  3.8G   1% /run
none            3.8G     0  3.8G   0% /run/lock
none            3.8G     0  3.8G   0% /run/user
drivers         476G  203G  273G  43% /usr/lib/wsl/drivers
none            3.8G     0  3.8G   0% /usr/lib/wsl/lib
none            3.8G  4.0K  3.8G   1% /mnt/wsl
none            3.8G   80K  3.8G   1% /mnt/wslg
none            3.8G   96K  3.8G   1% /mnt/wslg/versions.txt
none            3.8G   96K  3.8G   1% /mnt/wslg/doc
tmpfs           3.8G     0  3.8G   0% /tmp
none            3.8G     0  3.8G   0% /usr/lib/modules/5.15.167.4-microsoft-standard-WSL2
C:\             476G  203G  273G  43% /mnt/c
tmpfs           765M  4.0K  765M   1% /run/user/1000
tmpfs           765M  4.0K  765M   1% /run/user/0
z:\            1007G   63G  893G   7% /mnt/z
[user@podman-machine-default ~]$
ファイルへのアクセスも可能です。
[user@podman-machine-default ~]$ cd /mnt/z/home/macocci7/work/
Memo/               lara12app/          moonshine3-app/     simple-slides/
bash-colorizer-app/ macocci7/           mzch-php-build/     uri-app/
django/             macocci7-net/       phptest/            worklog/
lara11app/          moonshine-app/      process-app/
[user@podman-machine-default ~]$ cd /mnt/z/home/macocci7/work/lara12app
[user@podman-machine-default lara12app]$ ls -la
total 348
drwxrwxrwx 12 root root    512 Apr 17 20:27 .
drwxrwxrwx 17 root root    512 Apr 12 17:38 ..
-rwxrwxrwx  1 root root    258 Feb 25 00:40 .editorconfig
-rwxrwxrwx  1 root root   1135 Feb 25 21:58 .env
-rwxrwxrwx  1 root root   1084 Feb 25 00:40 .env.example
-rwxrwxrwx  1 root root    186 Feb 25 00:40 .gitattributes
-rwxrwxrwx  1 root root    286 Feb 25 00:40 .gitignore
-rwxrwxrwx  1 root root   4109 Feb 25 00:40 README.md
drwxrwxrwx  5 root root    512 Feb 25 00:40 app
-rwxrwxrwx  1 root root    425 Feb 25 00:40 artisan
drwxrwxrwx  3 root root    512 Feb 25 00:40 bootstrap
-rwxrwxrwx  1 root root   2310 Feb 25 00:40 composer.json
-rwxrwxrwx  1 root root 297427 Feb 25 21:58 composer.lock
drwxrwxrwx  2 root root    512 Feb 25 00:40 config
drwxrwxrwx  5 root root    512 Apr 17 21:33 database
-rwxrwxrwx  1 root root      6 Apr 17 20:26 hello.txt
-rwxrwxrwx  1 root root    355 Feb 25 00:40 package.json
-rwxrwxrwx  1 root root   1191 Feb 25 00:40 phpunit.xml
drwxrwxrwx  2 root root    512 Feb 25 00:40 public
drwxrwxrwx  5 root root    512 Feb 25 00:40 resources
drwxrwxrwx  2 root root    512 Feb 25 00:40 routes
-rwxrwxrwx  1 root root      8 Apr 17 20:27 seeyou.txt
drwxrwxrwx  5 root root    512 Feb 25 00:40 storage
drwxrwxrwx  4 root root    512 Feb 25 00:40 tests
drwxrwxrwx 40 root root    512 Feb 25 21:58 vendor
-rwxrwxrwx  1 root root    331 Feb 25 00:40 vite.config.js
[user@podman-machine-default lara12app]$ cat vite.config.js
import { defineConfig } from 'vite';
import laravel from 'laravel-vite-plugin';
import tailwindcss from '@tailwindcss/vite';

export default defineConfig({
    plugins: [
        laravel({
            input: ['resources/css/app.css', 'resources/js/app.js'],
            refresh: true,
        }),
        tailwindcss(),
    ],
});
[user@podman-machine-default lara12app]$
マウント解除は次のコマンド。
sudo umount /mnt/z自動マウント設定
Podman Machineターミナルで、root権限で「/etc/fstab」を編集し、末尾に次の行を追記します。
z: /mnt/z drvfs metadata,noatime,uid=1000,gid=1000,defaults 0 0筆者はvi派です。
echo コマンドで出力させてリダイレクトで追記もアリですが、
1回勝負。
sudo echo "z: /mnt/z drvfs metadata,noatime,uid=1000,gid=1000,defaults 0 0" >> /etc/fstabマウントを実行してみます。
[user@podman-machine-default ~]$ sudo mount -a
<3>WSL (21670 - ) ERROR: UtilGetPpid:1279: Failed to parse: /proc/20287/stat, content: 20287 (su) S 0 0 0 34821 21666 4194560 531 0 2 0 0 0 0 0 20 0 1 0 1046516 13815808 1654 18446744073709551615 94265176428544 94265176456481 140733114451600 0 0 0 2147196671 0 16384 1 0 0 17 14 0 0 0 0 0 94265176479632 94265176481796 94265595781120 140733114455798 140733114455809 140733114455809 140733114458092 0
[user@podman-machine-default ~]$
マウントされているか確認します。
[user@podman-machine-default ~]$ df -h
df: /proc/sys/fs/binfmt_misc: Too many levels of symbolic links
Filesystem      Size  Used Avail Use% Mounted on
/dev/sdd       1007G  1.4G  955G   1% /
rootfs          3.8G  2.4M  3.8G   1% /init
none            3.8G     0  3.8G   0% /dev
none            3.8G   84K  3.8G   1% /dev/shm
tmpfs           4.0M     0  4.0M   0% /sys/fs/cgroup
none            3.8G  592K  3.8G   1% /run
none            3.8G     0  3.8G   0% /run/lock
none            3.8G     0  3.8G   0% /run/user
drivers         476G  203G  273G  43% /usr/lib/wsl/drivers
none            3.8G     0  3.8G   0% /usr/lib/wsl/lib
none            3.8G  4.0K  3.8G   1% /mnt/wsl
none            3.8G   84K  3.8G   1% /mnt/wslg
none            3.8G   96K  3.8G   1% /mnt/wslg/versions.txt
none            3.8G   96K  3.8G   1% /mnt/wslg/doc
tmpfs           3.8G     0  3.8G   0% /tmp
none            3.8G     0  3.8G   0% /usr/lib/modules/5.15.167.4-microsoft-standard-WSL2
C:\             476G  203G  273G  43% /mnt/c
tmpfs           765M  4.0K  765M   1% /run/user/1000
tmpfs           765M  4.0K  765M   1% /run/user/0
z:             1007G   63G  893G   7% /mnt/z
[user@podman-machine-default ~]$
シンボリックリンク作成
今回、Podman MachineをUbuntuと同じディレクトリ階層にしたいので、
/home/[Ubuntu上のユーザー名]
のようなシンボリックリンクを作成していきます。
以降の作業は、Ubuntu上のユーザー名を「macocci7」としていくので適宜読み替えしてください。
※前提として、ユーザー名は「user」以外であるとします。
Podman Machineのターミナル上でコマンドを実行します。
sudo ln -s /mnt/z/home/macocci7 /home/macocci7※「user」はPodman Machine側で使用しているユーザーのため、
※「user」の場合は、「/home/user/」配下の場所にシンボリックリンクを作成します。
sudo ln -s /mnt/z/home/user/project /home/user/projectこれで、Podman Machine側でも、Ubuntu側と同じパスでUbuntuのファイルシステムへアクセスできます。
動作確認で悶絶してみよう
UbuntuのターミナルでPodmanコンテナにUbuntu側のフォルダをmountさせてみます。
- マウント元: [Ubuntu] /home/macocci7/work/lara12app
- マウント先: [コンテナ] /var/www/html
podman run -it --rm \
    --mount type=bind,src=/home/macocci7/work/lara12app,target=/var/www/html \
    docker.io/amazonlinux:latest bash
コンテナのプロンプトになるので、マウントされているか確認してみます。
bash-5.2# ls -la /var/www/html
total 352
drwxrwxrwx 12 1000 1000    512 Apr 17 11:27 .
drwxr-xr-t  3 root     root       4096 Apr 17 13:03 ..
-rwxrwxrwx  1 1000 1000    258 Feb 24 15:40 .editorconfig
-rwxrwxrwx  1 1000 1000   1135 Feb 25 12:58 .env
-rwxrwxrwx  1 1000 1000   1084 Feb 24 15:40 .env.example
-rwxrwxrwx  1 1000 1000    186 Feb 24 15:40 .gitattributes
-rwxrwxrwx  1 1000 1000    286 Feb 24 15:40 .gitignore
-rwxrwxrwx  1 1000 1000   4109 Feb 24 15:40 README.md
drwxrwxrwx  5 1000 1000    512 Feb 24 15:40 app
-rwxrwxrwx  1 1000 1000    425 Feb 24 15:40 artisan
drwxrwxrwx  3 1000 1000    512 Feb 24 15:40 bootstrap
-rwxrwxrwx  1 1000 1000   2310 Feb 24 15:40 composer.json
-rwxrwxrwx  1 1000 1000 297427 Feb 25 12:58 composer.lock
drwxrwxrwx  2 1000 1000    512 Feb 24 15:40 config
drwxrwxrwx  5 1000 1000    512 Apr 17 12:33 database
-rwxrwxrwx  1 1000 1000    355 Feb 24 15:40 package.json
-rwxrwxrwx  1 1000 1000   1191 Feb 24 15:40 phpunit.xml
drwxrwxrwx  2 1000 1000    512 Feb 24 15:40 public
drwxrwxrwx  5 1000 1000    512 Feb 24 15:40 resources
drwxrwxrwx  2 1000 1000    512 Feb 24 15:40 routes
drwxrwxrwx  5 1000 1000    512 Feb 24 15:40 storage
drwxrwxrwx  4 1000 1000    512 Feb 24 15:40 tests
drwxrwxrwx 40 1000 1000    512 Feb 25 12:58 vendor
-rwxrwxrwx  1 1000 1000    331 Feb 24 15:40 vite.config.js
bash-5.2#
Ubuntu側でファイルを追加してみます。
macocci7@iyasaka:~/work/lara12app$ echo "hello!" > hello.txtコンテナ側で確認してみます。
bash-5.2# cat hello.txt
hello
bash-5.2#
コンテナ側でもファイルを追加してみます。
bash-5.2# echo "See you!" > seeyou.txtUbuntu側で確認してみます。
macocci7@iyasaka:~/work/lara12app$ cat seeyou.txt
see you
macocci7@iyasaka:~/work/lara12app$
双方向で同期がとれていることが確認できました。
さて、ここからがお楽しみの悶絶タイムです。
せっかくなので、Laravelが動くようにコンテナ側にPHPをインストールしていきましょう。
まずはシステムの基本的なパッケージから
dnf update \
  && dnf -y install \
  systemd systemd-devel tar zip unzip sudo \
  procps-ng net-tools which vim git
ユーザー「ec2-user」を追加します。
useradd "ec2-user" && echo "ec2-user ALL=NOPASSWD: ALL" >> /etc/sudoersユーザー「ec2-user」にスイッチします。
su ec2-userLaravel公式で紹介されている方法でPHPをインストールします。
/bin/bash -c "$(curl -fsSL https://php.new/install/linux/8.4)"「~/.bashrc」に追加された環境変数を適用します。
source ~/.bashrcPHPのインストール場所は ec2-user のホームディレクトリ内になります。
[ec2-user@8d81aefdf074 ~]$ which php
~/.config/herd-lite/bin/php
[ec2-user@8d81aefdf074 ~]$
PHPのバージョンを確認します。
php -vでは、artisanコマンドでLaravelのバージョンを表示して悶絶してみましょう。
time php artisan --version▼実行結果
Laravel Framework 12.0.1

real    0m30.176s
user    0m0.146s
sys     0m0.377s
もっと悶絶してみたい方は、Laravelのビルトインサーバーを起動して
php aritsan serve &30秒以上待ってから、curlで http://localhost:8000/ にアクセスしてみましょう。
time curl http://127.0.0.1:8000/▼実行結果
・・・(省略)・・・
            </body>
</html>

real    0m18.932s
user    0m0.000s
sys     0m0.011s
再帰的なオーナー変更はさらに悶絶ものです。
[ec2-user@8d81aefdf074 html]$ time sudo chown -R root:root /var/www/html

real    1m52.816s
user    0m0.002s
sys     0m0.008s
[ec2-user@8d81aefdf074 html]$
オーナー変更だけで1分52秒掛かってます。
[ec2-user@8d81aefdf074 html]$ time sudo chmod -R o-w /var/www/html

real    2m18.262s
user    0m0.014s
sys     0m0.000s
[ec2-user@8d81aefdf074 html]$
パーミッション変更はさらに時間が掛かってます。
そしてこれらの操作は全くの無駄に終わっています。
オーナーもパーミッションも変更できません。
以上です。
さて、次回はRCLONEでも試してみましょうかね。
参考サイト
▼リモートファイルシステムがサポートされてない件
▼ホストOSのファイルシステムのバインドボリュームはサポートされた件
▼Laravel12公式ドキュメント:PHP8.4インストール
▼ネットワークドライブの自動マウント

▼ファイルシステムベンチマーク
- 0
- 0
- 0
- 0
コメント