Laravel11のNotificationsの使い方の解説です。

Notificationsとは
名前の通り、「通知」機能です。
メール、SMS、Slack、Facebook等、様々な方法での通知の送信が可能です。
メール送信については、別記事でも記載した通り、Mailableでの送信方法もあります。
Notificationsの強みは、通知手段の豊富さです。
また、NotificationsではMailableを利用したメール送信も可能です。
前提条件
- Ubuntu上で作業しています。
- PHP8.2以降インストール済
- Composerインストール済
これからやること
- Laravel新規プロジェクト作成
- Notificationクラス作成
- mailpitインストール&起動(メール送信&確認用)
- .env修正
- ビルトインサーバー起動(リンクURLクリック時用)
- tinker起動
- ユーザー作成
- Notification送信
- メールの確認
- メール文面のカスタマイズ
- Notification再送信
- メールの再確認
Laravel新規プロジェクト作成
新規プロジェクト「notification-mail」を作成します。
composer create-project laravel/laravel:^11 notification-mail
プロジェクトフォルダに入ります。
cd notification-mailNotificationクラス作成
Notificationの定義を司るNotificationクラス「InvoicePaid」(請求支払い済)を作成してみます。
php artisan make:notification InvoicePaid
「app/Notifications」フォルダが作成され、
その中に「InvoicePaid.php」が作成されました。
中のメソッドは、デフォルトで
- public function __construct()
- public function via(object $notifiable): array
- public function toMail(object $notifiable): MailMessage
- public function toArray(object $notifiable): array
が実装されています。
「via()」メソッドで通知手段の選択(メール、SMS、Slack等)を行います。
デフォルトで「メール」の設定になっています。
    public function via(object $notifiable): array
    {
        return ['mail'];
    }
「toMail()」メソッドでメールの内容を定義します。
デフォルトで何やら文面と、文面内に設置するリンクURLが設定されています。
    public function toMail(object $notifiable): MailMessage
    {
        return (new MailMessage)
                    ->line('The introduction to the notification.')
                    ->action('Notification Action', url('/'))
                    ->line('Thank you for using our application!');
    }
Notificationの送信方法の概要
次の2通りあります。
1.「Notifiable」トレイトを使う
2.「Notification」ファサードを使う
「Notifiable」トレイトは、デフォルトでUserモデルに組み込まれています。
▼\App\Models\Userの抜粋
use Illuminate\Notifications\Notifiable;

class User extends Authenticatable
{
    use HasFactory, Notifiable;

・・・(以下略)・・・
これにより、
use App\Models\User;
use App\Notifications\InvoicePaid;

$user = User::find($id);
$user->notify(new InvoicePaid());
のような形でNotificationを送信できます。
「Notifiable」トレイトは、email等の送信先の情報があればどのモデルでも使用可能です。
「Notification」ファサードは、モデルにトレイトを追加しなくても良いのと、Collectionを渡して処理できるので、可用性が高いかもしれません。
use App\Models\Invoice;
use Illuminate\Support\Facades\Notification;

$users = Invoice::paidUsers();
Notification::send($users, new InvoicePaid());
mailpitインストール&起動
メール送信と確認用にmailpitをインストールして起動します。
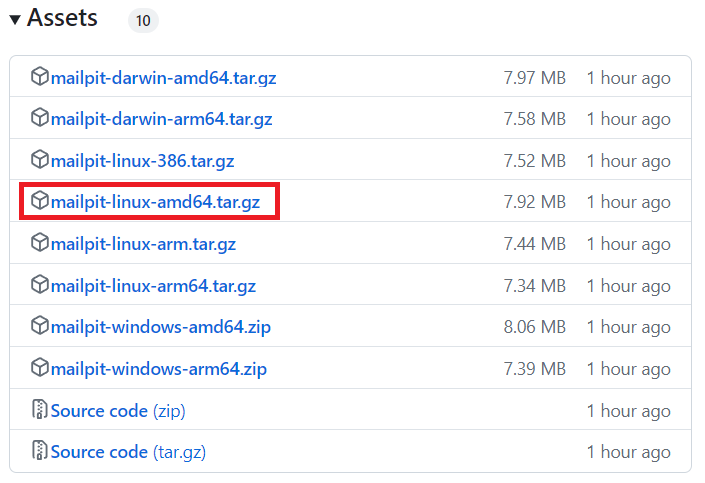
mailpitの最新版リリースの「Assets」から、アーキテクチャに合わせたアーカイブをダウンロードします。
筆者の環境はUbuntuでamd 64bitなので、「mailpit-linux-amd64.tar.gz」をダウンロードします。
「vendor/mailpit」にでも設置することにしましょう。
mkdir vendor/mailpit
cd vendor/mailpit
wget https://github.com/axllent/mailpit/releases/download/v1.18.6/mailpit-linux-amd64.tar.gz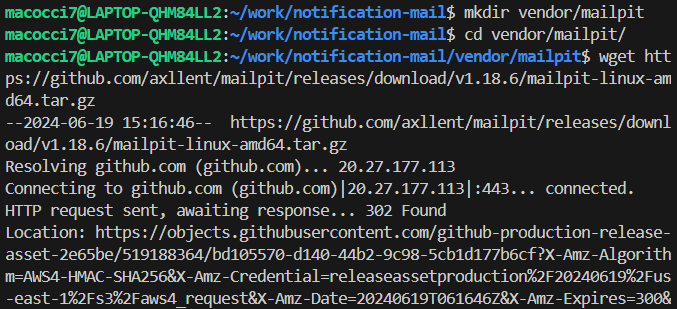
アーカイブを展開します。
tar xfz mailpit-linux-amd64.tar.gz
mailpitを起動します。
./mailpit
1025番ポート経由でSMTPが利用可能です。
送信されたメールは、8025番経由でWEBブラウザから閲覧可能です。
mailpitを停止する時は、このターミナル上で [Ctrl] + [C] で強制終了させます。
.env修正
プロジェクトトップにある「.env」を修正します。
Notificationメールのリンクに使用される「APP_URL」にポート番号「:8000」を追記します。
APP_URL=http://localhost:8000mailpit経由でメールをSMTPで送信する設定に変更します。
ポート番号は1025です。
MAIL_MAILER=smtp
MAIL_HOST=127.0.0.1
MAIL_PORT=1025
ビルトインサーバー起動
送信メール内のリンクをクリックした時にWEBサイトへ移動できるように
Laravelのビルトインサーバーを起動しておきます。
php artisan serve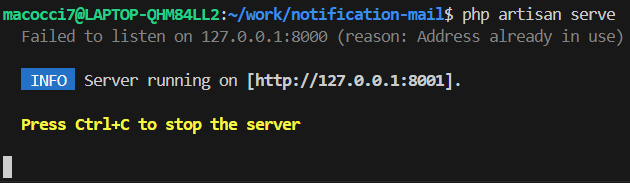
tinker起動
今回はユーザー作成とNotification送信作業をtinker経由で実施します。
新しいターミナルでtinkerを起動します。
php artisan tinker
ユーザー作成
ダミーユーザーを適当に何件か作成します。
tinkerのターミナルでコマンドを実行します。
use App\Models\User;
User::factory()->count(20)->create();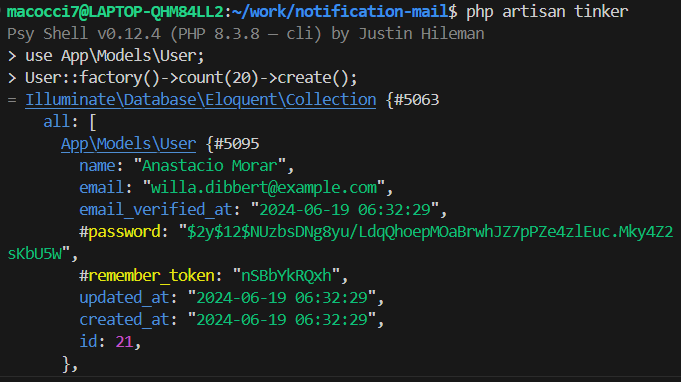
作成されたモデルが順次表示されるので、「q」キーでキャンセルします。
Notification送信
tinkerのターミナルでNotification送信を実行します。
▼Notifiableトレイトを使った個別送信例
use App\Notifications\InvoicePaid;
$user = User::find(1);
$user->notify(new InvoicePaid());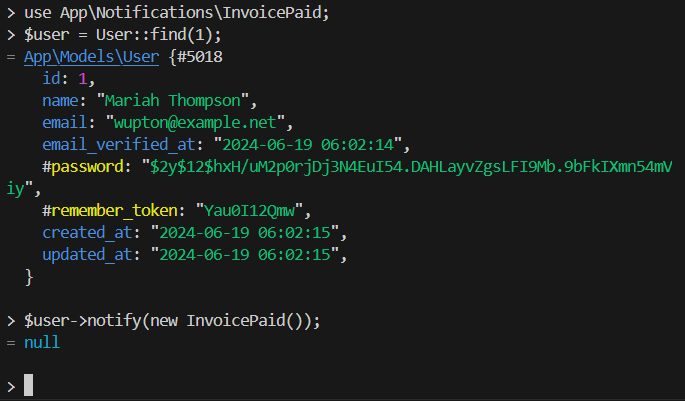
▼Notificationファサードを使った一括送信例
use Illuminate\Support\Facades\Notification;
$users = User::all();
Notification::send($users, new InvoicePaid());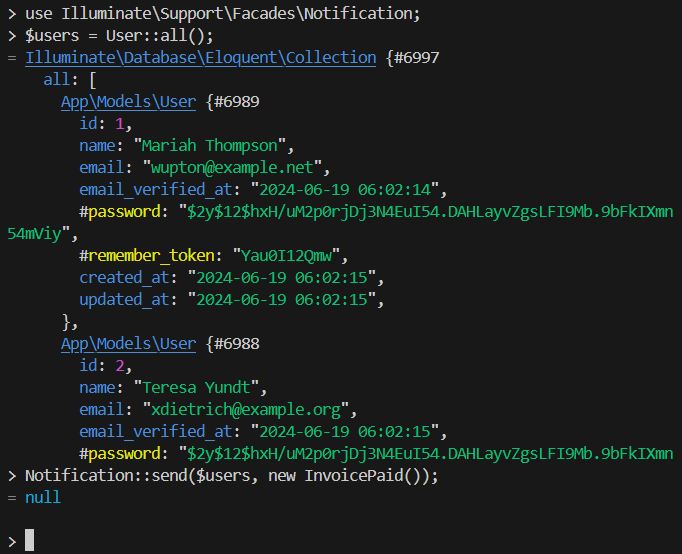
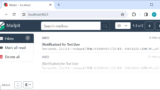
メールの確認
では、メールを確認してみます。
WEBブラウザで http://localhost:8025/ にアクセスします。
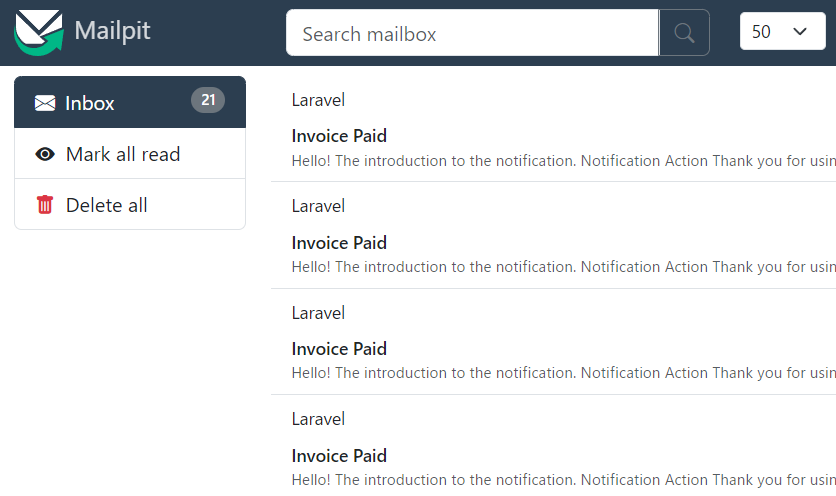
Notifiableで送信した1件+Notificationファサードで送信した20件が表示されています。
内容を確認してみます。
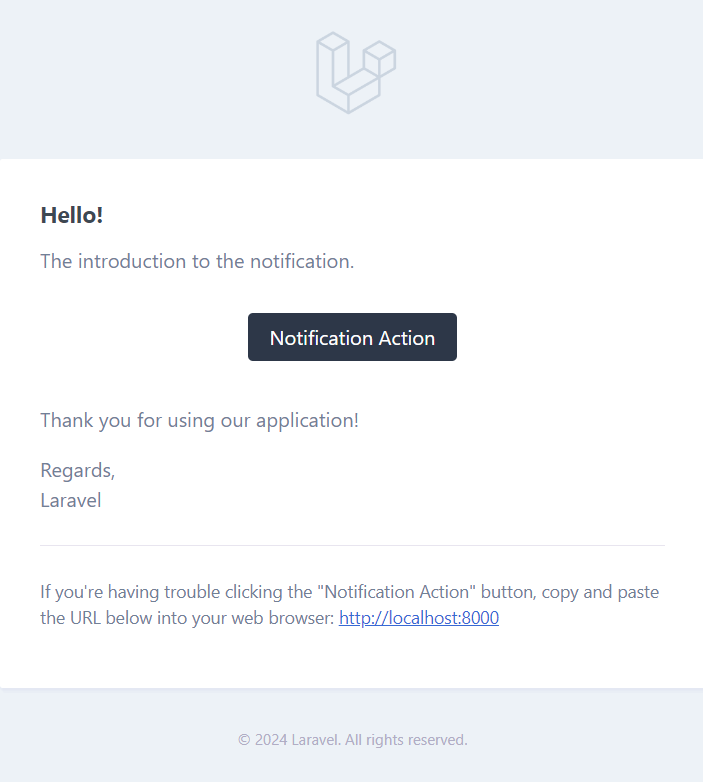
デフォルトの設定でこのようなHTMLメールになっています。
「Notification Action」ボタンはローカルのトップページへのリンクになっています。
メール文面のカスタマイズ
「app\Notifications\InvoicePaid::toMail()」を編集することで、
メール文面やヘッダーをカスタマイズすることができます。
▼一応、コンストラクターも修正しておきます。
    public function __construct(
        protected \stdClass $invoice,
    ) {
    }
▼toMail()
public function toMail(object $notifiable): MailMessage
{
$url = url('/invoice/' . $this->invoice->id);
return (new MailMessage)
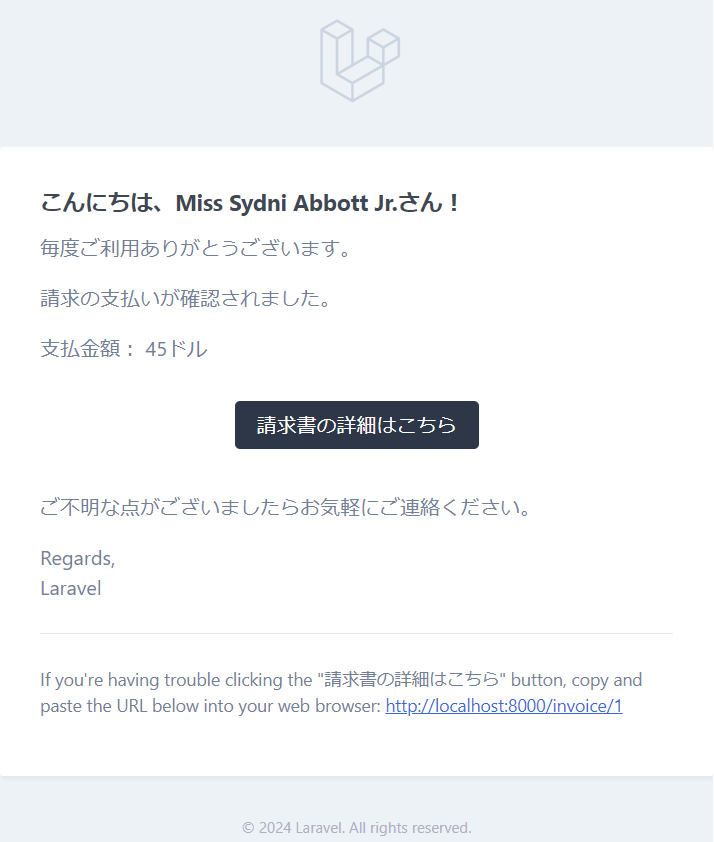
->greeting('こんにちは、' . $notifiable->name . 'さん!')
->line('毎度ご利用ありがとうございます。')
->line('請求の支払いが確認されました。')
->lineIf(
$this->invoice->amount > 0,
'支払金額: '
. $this->invoice->amount
. $this->invoice->currencyUnit
)
->action('請求書の詳細はこちら', $url)
->line('ご不明な点がございましたらお気軽にご連絡ください。');
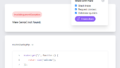
}一応、請求書の詳細ページを用意しておきましょう。
▼「routes\web.php」に追記
Route::get('/invoice/{id}', function (int $id) {
    return "請求書No.{$id}:支払い済";
})->whereNumber('id');
コードの修正を反映するために、一度tinkerを終了して再起動します。
というのが面倒なので、筆者はシェルの無限ループでtinkerを実行するようにしています。

※Tinkerwellのオープンソースか教育用のライセンスを取得すれば無料でホットリロード可能なようですが、申請がいちいち面倒なので。。

▼「~/.bashrc」に関数追記しています。
tinker() {
        if [ ! -f artisan ]; then
                echo "Cannot find artisan. Operation aborted."
                return 1
        fi
        while true; do php artisan tinker; done
}
「~/.bashrc」に追記後は
source ~/.bashrcを忘れずに。
こうしておくことで、
tinkerでtinkerを無限ループ実行すれば、
コード修正後に「exit」(または [Ctrl] + [D] )するだけで、tinkerが再起動します。
※終了するときは [Ctrl] + [C]
ただし、use宣言や変数の値は解放されているので再定義が必要です。
[↑]キーで履歴を辿って再実行すれば多少の手間は省けます。
では、Notificationを再送信してみます。
tinker
use App\Models\User;
use App\Notifications\InvoicePaid;
$user = User::find(1);
$invoice = (object) ['id' => 1, 'amount' => 45, 'currencyUnit' => 'ドル'];
$user->notify(new InvoicePaid($invoice));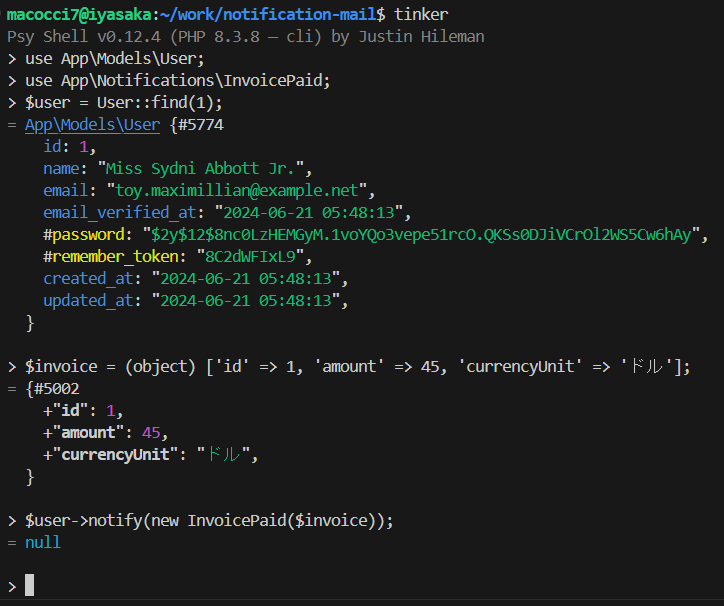
mailpitのメールを確認してみましょう。
メールの文面修正が反映されています。
「請求書の詳細はこちら」のリンクをクリックしてみます。
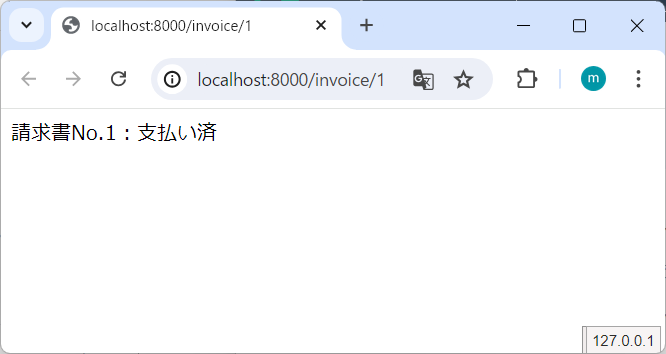
請求書詳細ページが表示されました。
Actionボタンの色変更
メッセージの「level」を指定することで、メール文面内のActionボタンの色を変更できます。
「toMail()」メソッド内の「Mailable」のメソッドチェーンに追記します。
->success() // Actionボタンが緑になる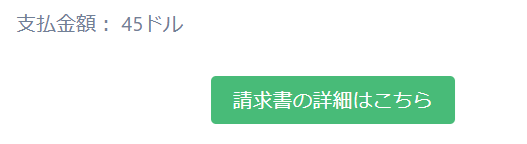
->error() // Actionボタンが赤になる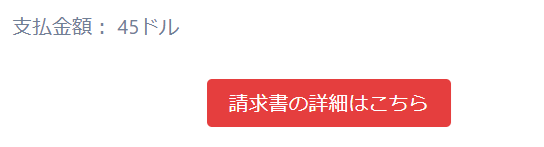
テンプレートのカスタマイズ
デフォルトのメールテンプレートをカスタマイズする場合は、
テンプレートを編集できるようにpublishします。
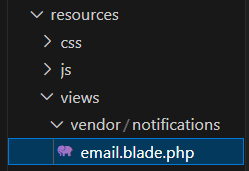
php artisan vendor:publish --tag=laravel-notifications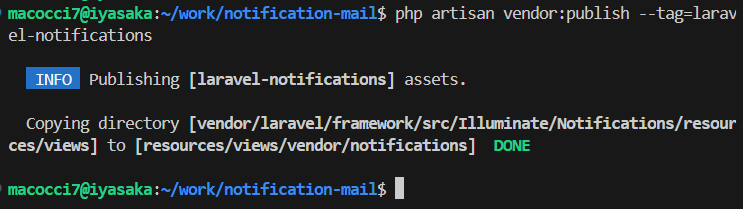
「resources/views/vendor/notifications/email.blade.php」が作成されます。
▼デフォルトテンプレート
<x-mail::message>
{{-- Greeting --}}
@if (! empty($greeting))
# {{ $greeting }}
@else
@if ($level === 'error')
# @lang('Whoops!')
@else
# @lang('Hello!')
@endif
@endif

{{-- Intro Lines --}}
@foreach ($introLines as $line)
{{ $line }}

@endforeach

{{-- Action Button --}}
@isset($actionText)
<?php
    $color = match ($level) {
        'success', 'error' => $level,
        default => 'primary',
    };
?>
<x-mail::button :url="$actionUrl" :color="$color">
{{ $actionText }}
</x-mail::button>
@endisset

{{-- Outro Lines --}}
@foreach ($outroLines as $line)
{{ $line }}

@endforeach

{{-- Salutation --}}
@if (! empty($salutation))
{{ $salutation }}
@else
@lang('Regards'),<br>
{{ config('app.name') }}
@endif

{{-- Subcopy --}}
@isset($actionText)
<x-slot:subcopy>
@lang(
    "If you're having trouble clicking the \":actionText\" button, copy and paste the URL below\n".
    'into your web browser:',
    [
        'actionText' => $actionText,
    ]
) <span class="break-all">[{{ $displayableActionUrl }}]({{ $actionUrl }})</span>
</x-slot:subcopy>
@endisset
</x-mail::message>
大体なにをやっているのかわかると思います。
今回はデフォルトテンプレートのカスタマイズは省きます。
他のテンプレートを使う
▼HTMLメールの場合
※ 「view()」メソッドで、Bladeテンプレートを指定し、
※ 必要に応じてテンプレート変数を指定する。
※ テンプレートは「resources/views/」に設置する。
※ この場合は「resources/views/mail/invoice/paid.blade.php」を指定している。
    public function toMail(object $notifiable): MailMessage
    {
        return (new MailMessage)->view(
            'mail.invoice.paid', ['invoice' =>  $this->invoice]
        );
    }
▼テキストメールの場合
※ 「text()」メソッドで、Bladeテンプレートを指定し、必要に応じてテンプレート変数を指定する。
    public function toMail(object $notifiable): MailMessage
    {
        return (new MailMessage)->text(
            'mail.invoice.paid-text', ['invoice' => $this->invoice]
        );
    }
▼Markdownの場合
    public function toMail(object $notifiable): MailMessage
    {
        return (new MailMessage)->markdown(
            'mail.invoice.paid', ['invoice' => $this->invoice]
        );
    }
▼MarkdownのBladeテンプレート例
※「<x-mail::message>~</x-mail:message>」で括る必要があります。
<x-mail::message>
# 請求の支払い完了

あなたへの請求の支払いが完了しました!

支払い金額: {{ $invoice->amount }}{{ $invoice->currencyUnit }}

<x-mail::button :url="$url">
請求書の詳細はこちら
</x-mail::button>

ありがとうございました。<br>
{{ config('app.name') }}
</x-mail::message>
メールヘッダーの設定
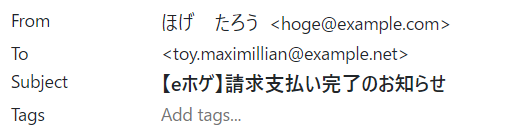
▼From(送信者)とSubject(件名)
    public function toMail(object $notifiable): MailMessage
    {
        return (new MailMessage)
                    ->from('hoge@example.com', 'ほげ たろう')
                    ->subject('【eホゲ】請求支払い完了のお知らせ')
                    ->greeting('こんにちは、' . $notifiable->name . 'さん!');
    }
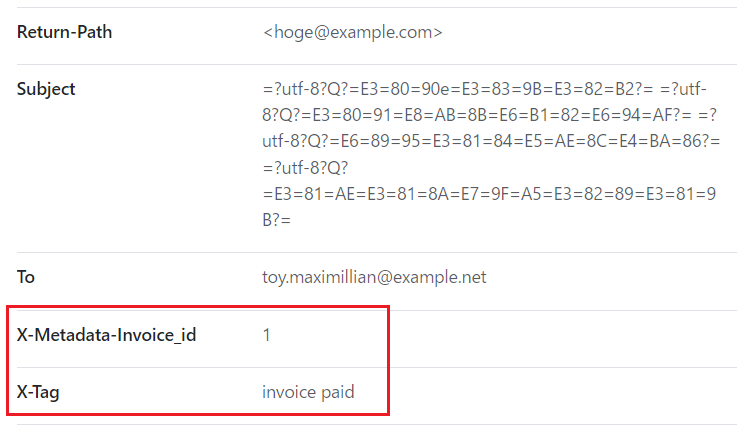
▼TagとMetadata
    public function toMail(object $notifiable): MailMessage
    {
        return (new MailMessage)
                    ->tag('invoice paid')
                    ->metadata('invoice_id', $this->invoice->id)
                    ->greeting('こんにちは、' . $notifiable->name . 'さん!');
    }
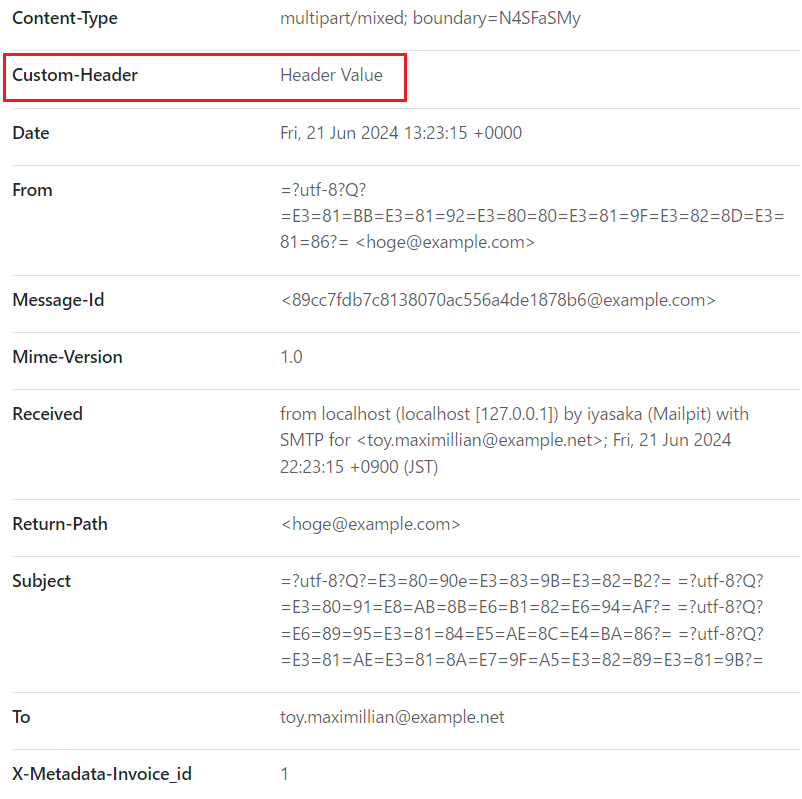
▼Symfony Messageを使ったカスタムヘッダーの設定
use Symfony\Component\Mime\Email;

    public function toMail(object $notifiable): MailMessage
    {
        return (new MailMessage)
                    ->withSymfonyMessage(function (Email $message) {
                        $message->getHeaders()->addTextHeader(
                            'Custom-Header', 'Header Value'
                        );
                    })
                    ->from('hoge@example.com', 'ほげ たろう')
                    ->subject('【eホゲ】請求支払い完了のお知らせ')
                    ->tag('invoice paid')
                    ->metadata('invoice_id', $this->invoice->id)
                    ->greeting('こんにちは、' . $notifiable->name . 'さん!');
}
▼送信結果
添付ファイル(ストレージ上の単一ファイル)
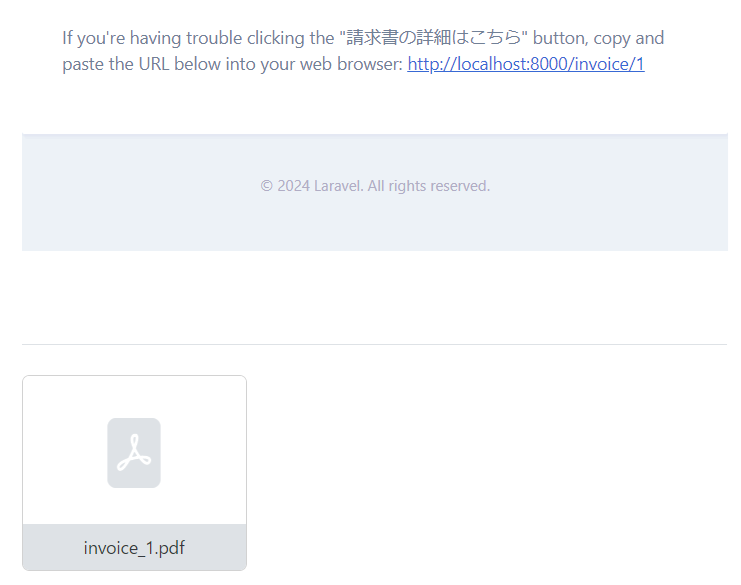
添付ファイルは「MailMessage」のメソッドとして「attache(ファイルパス)」を指定するだけです。
▼例:「storage/app/invoice/invoice_1.pdf」を添付する場合
    public function toMail(object $notifiable): MailMessage
    {
        return (new MailMessage)
                    ->greeting('こんにちは、' . $notifiable->name . 'さん!')
                    ->attach(
                        storage_path()
                        . '/app/invoice/invoice_'
                        . $this->invoice->id
                        . '.pdf'
                    );
    }
▼送信結果
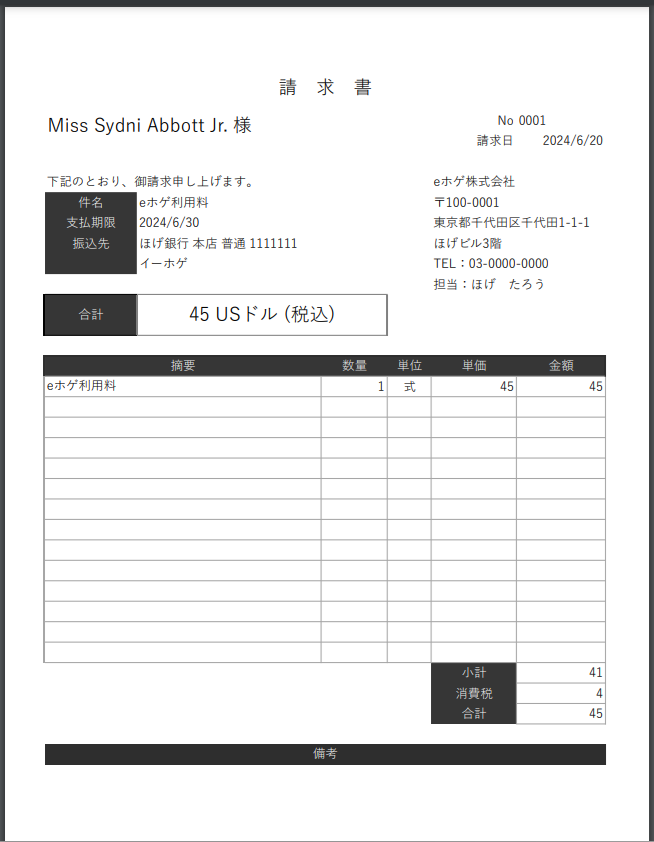
▼添付ファイルを開いてみる
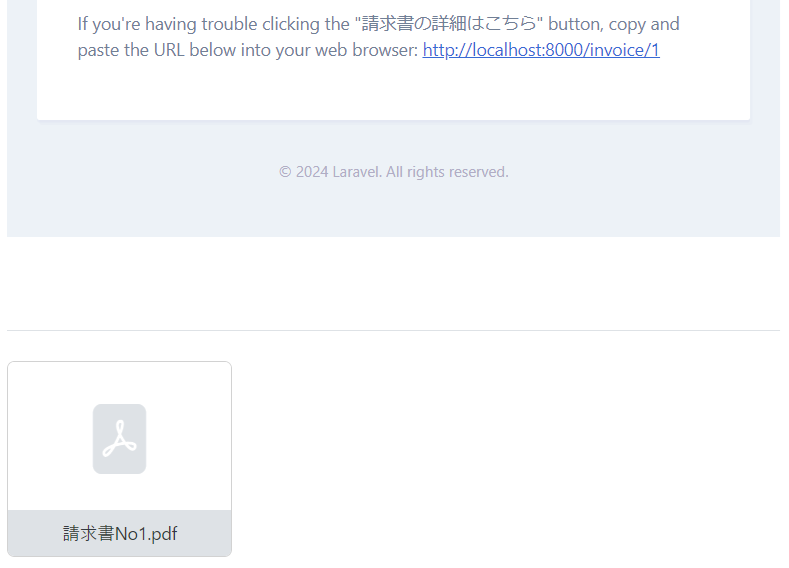
▼ファイル名とMIMEタイプ
※「attach()」メソッドの第二引数に配列で「as」「mime」を指定する
    public function toMail(object $notifiable): MailMessage
    {
        return (new MailMessage)
                    ->greeting('こんにちは、' . $notifiable->name . 'さん!')
                    ->attach(
                        storage_path()
                        . '/app/invoice/invoice_'
                        . $this->invoice->id
                        . '.pdf',
                        [
                            'as' => '請求書No' . $this->invoice->id . '.pdf',
                            'mime' => 'application/pdf',
                        ]
                    );
    }
▼送信結果
添付ファイル(ストレージ上の複数ファイル)
一応、上記の「attach()」メソッドを複数回実行すれば複数ファイルを添付できますが、
複数のファイルを一括で添付できるメソッドが用意されています。
「MailMessage」のメソッド「attacheMany()」の引数に配列で
ファイルパス(、ファイル名、MIMEタイプ)を指定していきます。
ファイルパスの指定の仕方は2通りで、
1.単純に文字列でファイルパスだけを指定
2.ファイルパスを配列キーとして、対応する配列内に「as」と「mime」を指定
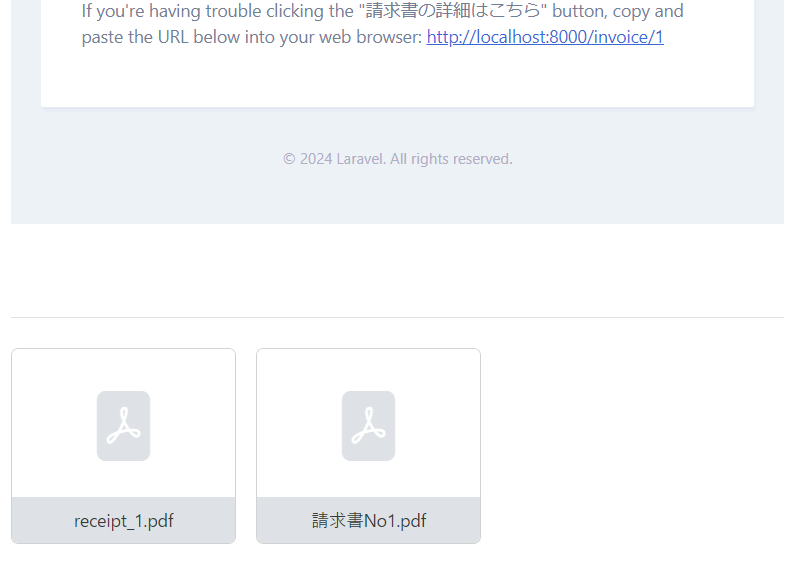
▼例:1の方法で領収書「receipt_1.pdf」、2の方法で請求書「invoice_1.pdf」を添付
    public function toMail(object $notifiable): MailMessage
    {
        return (new MailMessage)
                    ->greeting('こんにちは、' . $notifiable->name . 'さん!')
                    ->attachMany([
                        // 領収書
                        storage_path()
                        . '/app/receipt/receipt_'
                        . $this->invoice->id
                        . '.pdf',

                        // 請求書
                        storage_path()
                        . '/app/invoice/invoice_'
                        . $this->invoice->id
                        . '.pdf' => [
                            'as' => '請求書No' . $this->invoice->id . '.pdf',
                            'mime' => 'application/pdf',
                        ],
                    ]);
    }
▼送信結果
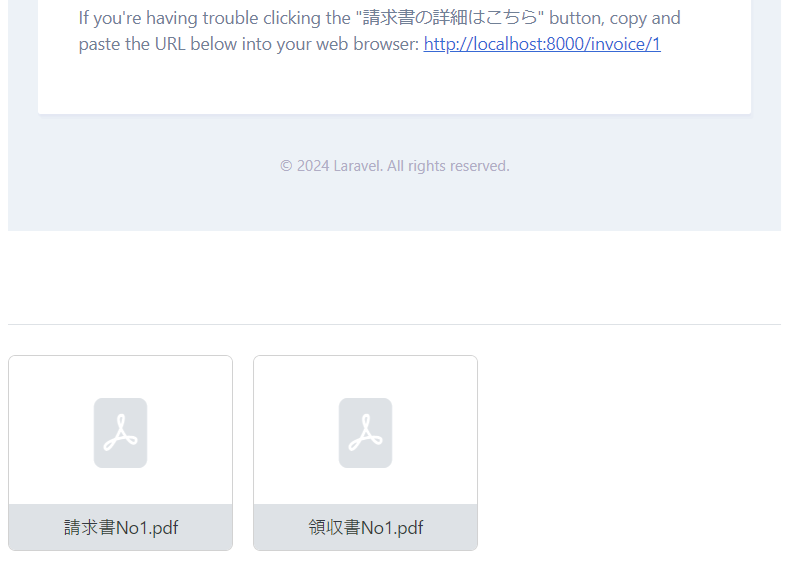
添付ファイル(生データ)
生データを添付する場合は、「MailMessage」の「attacheData()」メソッドで、
第一引数に生データ、第二引数にファイル名、第三引数に配列でMIMEタイプを指定します。
    public function toMail(object $notifiable): MailMessage
    {
        return (new MailMessage)
                    ->greeting('こんにちは、' . $notifiable->name . 'さん!')
                    ->attachData(
                        // PDF生データ
                        file_get_contents(
                            storage_path()
                            . '/app/invoice/invoice_'
                            . $this->invoice->id
                            . '.pdf'
                        ),
                        // ファイル名
                        '請求書No' . $this->invoice->id . '.pdf',
                        // MIMEタイプ
                        ['mime' => 'application/pdf',],
                    );
    }
▼送信結果

複数の生データをそれぞれ別ファイルとして添付する場合は
「attachData()」を複数回実行すればOKです。
    public function toMail(object $notifiable): MailMessage
    {
        return (new MailMessage)
                    ->greeting('こんにちは、' . $notifiable->name . 'さん!')
                    ->attachData(
                        // PDF生データ
                        file_get_contents(
                            storage_path()
                            . '/app/invoice/invoice_'
                            . $this->invoice->id
                            . '.pdf'
                        ),
                        // ファイル名
                        '請求書No' . $this->invoice->id . '.pdf',
                        // MIMEタイプ
                        ['mime' => 'application/pdf',],
                    )
                    ->attachData(
                        // PDF生データ
                        file_get_contents(
                            storage_path()
                            . '/app/receipt/receipt_'
                            . $this->invoice->id
                            . '.pdf'
                        ),
                        // ファイル名
                        '領収書No' . $this->invoice->id . '.pdf',
                        // MIMEタイプ
                        ['mime' => 'application/pdf',],
                    );
    }
▼実行結果
ストレージ上のファイル添付と生データのファイル添付の組み合わせも可能です。
    public function toMail(object $notifiable): MailMessage
    {
        return (new MailMessage)
                    ->greeting('こんにちは、' . $notifiable->name . 'さん!')
                    // ストレージ上のファイル
                    ->attach(
                        storage_path()
                        . '/app/invoice/invoice_'
                        . $this->invoice->id
                        . '.pdf',
                        [
                            'as' => '請求書No' . $this->invoice->id . '.pdf',
                            'mime' => 'application/pdf',
                        ],
                    )
                    // PDF生データ
                    ->attachData(
                        file_get_contents(
                            storage_path()
                            . '/app/receipt/receipt_'
                            . $this->invoice->id
                            . '.pdf'
                        ),
                        // ファイル名
                        '領収書No' . $this->invoice->id . '.pdf',
                        // MIMEタイプ
                        ['mime' => 'application/pdf',],
                    );
    }
▼送信結果

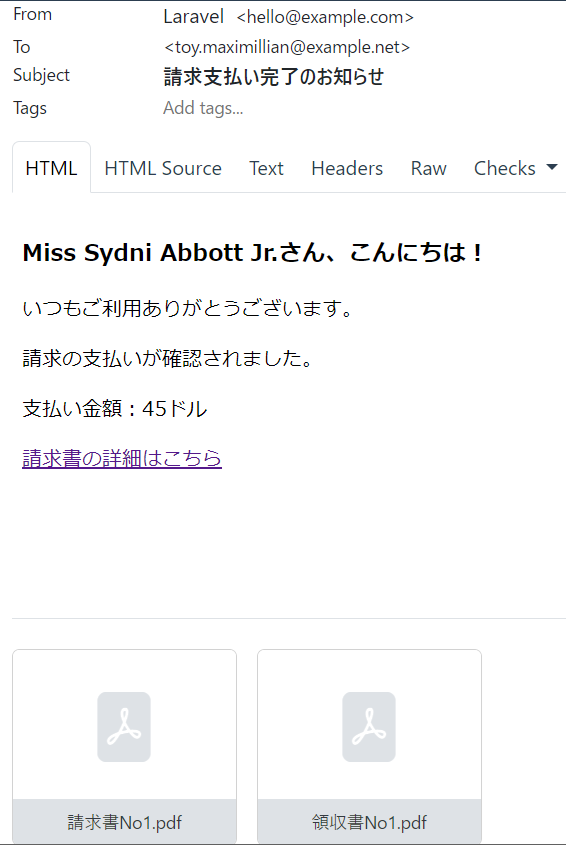
Mailableを使った送信
Notificationクラスの「toMail()」メソッドでMailableを返すことも可能です。
が、その場合には、Mailableの「to()」メソッドで送信先を指定する必要があります。
添付ファイルはMailableクラスの「attachments()」メソッド内で定義するのが良いと思います。
▼Mailableクラス作成
php artisan make:mail InvoicePaid
▼Mailableクラス「app/Mail/InvoicePaid.php」を編集します。
※宣言部に追記
use App\Models\User;
use Illuminate\Mail\Mailables\Attachment;
※コンストラクターを編集
    public function __construct(
        public User $user,
        public \stdClass $invoice,
        public string $url,
    ) {
    }
※「envelope()」を編集
    public function envelope(): Envelope
    {
        return new Envelope(
            subject: '請求支払い完了のお知らせ',
        );
    }
※「content()」を編集
    public function content(): Content
    {
        return new Content(
            view: 'mail.invoice.paid',
        );
    }
※「attachments()」を編集
    public function attachments(): array
    {
        return [
            // 既存ファイル添付
            Attachment::fromPath(
                // ファイルパス
                storage_path()
                . '/app/invoice/invoice_'
                . $this->invoice->id
                . '.pdf'
            )
                // メール上でのファイル名
                ->as('請求書No' . $this->invoice->id . '.pdf')
                // MIMEタイプ
                ->withMime('application/pdf'),

            // 生データ添付
            Attachment::fromData(
                // 生データ
                fn () => file_get_contents(
                    storage_path()
                    . '/app/receipt/receipt_'
                    . $this->invoice->id
                    . '.pdf'
                ),
                // メール上でのファイル名
                '領収書No' . $this->invoice->id . '.pdf',
            )
                // MIMEタイプ
                ->withMime('application/pdf'),
        ];
    }
▼メールテンプレート作成
php artisan make:view mail/invoice/paid
▼メールテンプレート「resources/views/mail/invoice/paid.blade.php」を編集
<div>
    <h3>{{ $user->name }}さん、こんにちは!</h3>
    <p>いつもご利用ありがとうございます。</p>
    <p>請求の支払いが確認されました。</p>
    <p>支払い金額:{{ $invoice->amount }}{{ $invoice->currencyUnit }}</p>
    <p><a href="{{ $url }}">請求書の詳細はこちら</a></p>
</div>
▼Notificationクラス「app/Notifications/InvoicePaid.php」を編集
※宣言部に追記
use App\Mail\InvoicePaid as InvoicePaidMailable;
use Illuminate\Mail\Mailable;
※「toMail()」を編集
    public function toMail(object $notifiable): Mailable
    {
        $url = url('/invoice/' . $this->invoice->id);
        return (new InvoicePaidMailable($notifiable, $this->invoice, $url))
            ->to($notifiable->email);
    }
▼実行結果
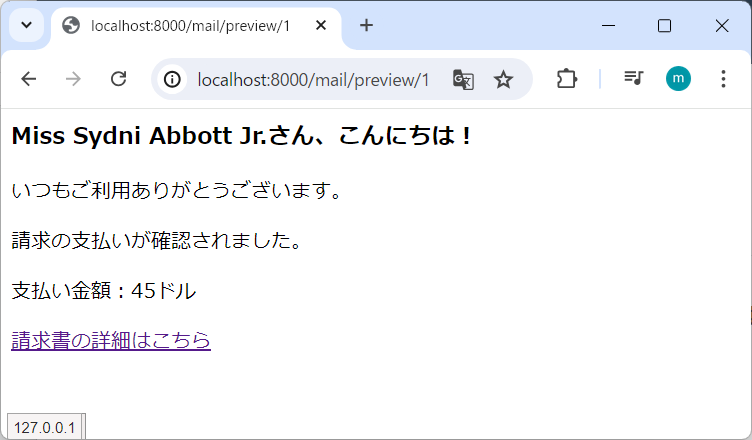
メールのプレビュー
Mailableクラスの「render()」メソッドを使うとメール文面のHTMLを取得することができます。
また、ルーティングでMailableを返すと、自動的にHTMLがレンダリングされ、
WEBブラウザ上でプレビュー機能として使うことができます。
▼「routes/web.php」に追記
Route::get('/mail/preview/{id}', function (int $id) {
    $user = \App\Models\User::find(1);
    $invoice = (object) [
        'id' => $id,
        'amount' => 45,
        'currencyUnit' => 'ドル',
    ];
    $url = url('/invoice/' . $invoice->id);
    return new App\Mail\InvoicePaid($user, $invoice, $url);
})->whereNumber('id');
▼WEBブラウザでの表示
今回は以上です。
- 1
- 0
- 0
- 0

コメント