以前作成したヒストグラム作成ツール「PHP-Histogram」をVersion 1.1.0にアップデートしました。
GitHub - macocci7/PHP-Histogram: PHP-Histogram creates histograms using FrequencyTable.
PHP-Histogram creates histograms using FrequencyTable. - macocci7/PHP-Histogram
github.com
インストールの仕方、基本的な使い方については、以前の記事をご覧ください。
主な変更点
▼機能面
- Neonファイルによる設定変更のサポート追加
- 配列による設定変更のサポート追加
- 透明背景のサポート追加
- PHP8.0のサポート停止(PHP 8.1以降で利用可)
▼構成面
- Intervention/image v3 にバージョンアップ
- GitHub Workflowの追加(開発用)
- 静的解析導入(PHPStan/PHPMD/PHPCS)
- PSR12対応
- examplesの追加
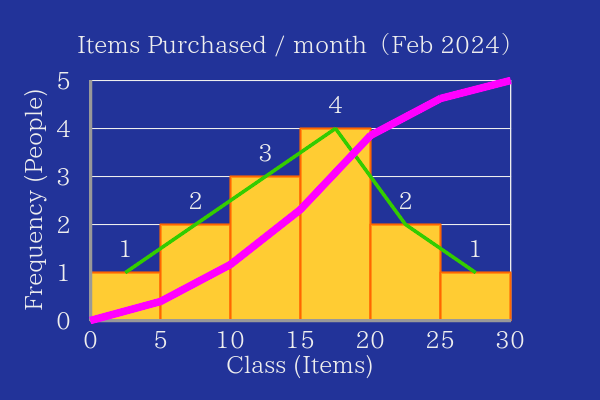
Neonファイルによる設定変更
次のようなNeonファイルを「examples/ChangePropsByNeon.neon」として保存します。
canvasWidth: 600
canvasHeight: 400
canvasBackgroundColor: '#223399'
frameXRatio: 0.7
frameYRatio: 0.6
axisColor: '#999'
axisWidth: 3
gridColor: '#eee'
gridWidth: 1
gridHeightPitch: 1
barBackgroundColor: '#ffcc33'
barBorderColor: '#ff6600'
barBorderWidth: 2
frequencyPolygonColor: '#33cc00'
frequencyPolygonWidth: 3
cumulativeRelativeFrequencyPolygonColor: '#ff00ff'
cumulativeRelativeFrequencyPolygonWidth: 7
fontPath: 'fonts/ipaexm.ttf'
fontSize: 24
fontColor: '#eeeeee'
showBar: true
showFrequencyPolygon: true
showCumulativeRelativeFrequencyPolygon: true
showFrequency: true
labelX: 'Class (Items)'
labelY: 'Frequency (People)'
caption: 'Items Purchased / month(Feb 2024)'
次のようなPHPコードを作成します。
<?php

require_once('../vendor/autoload.php');

use Macocci7\PhpHistogram\Histogram;

$hg = new Histogram();
$hg->setClassRange(5)
   ->setData([1, 5, 6, 10, 12, 14, 15, 16, 17, 18, 20, 24, 25])
   ->config('ChangePropsByNeon.neon')
   ->create('img/ChangePropsByNeon.png');
PHPコードを実行すると、次のような画像が生成されます。
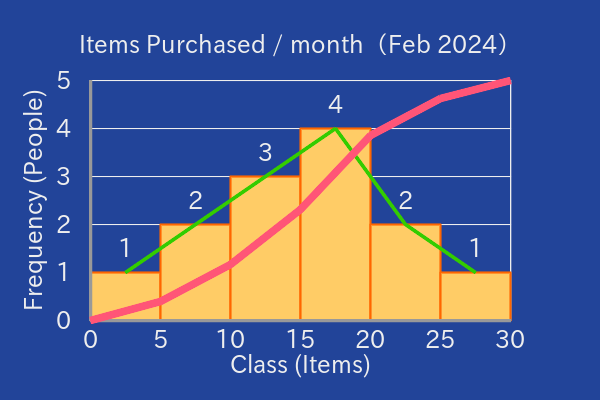
配列による設定変更
上記のような設定変更が配列を使っても可能です。
<?php

require_once('../vendor/autoload.php');

use Macocci7\PhpHistogram\Histogram;

$props = [
    'canvasWidth' => 600,
    'canvasHeight' => 400,
    'canvasBackgroundColor' => '#224499',
    'frameXRatio' => 0.7,
    'frameYRatio' => 0.6,
    'axisColor' => '#999',
    'axisWidth' => 3,
    'gridColor' => '#eee',
    'gridWidth' => 1,
    'gridHeightPitch' => 1,
    'barBackgroundColor' => '#ffcc66',
    'barBorderColor' => '#ff6600',
    'barBorderWidth' => 2,
    'frequencyPolygonColor' => '#33cc00',
    'frequencyPolygonWidth' => 3,
    'cumulativeRelativeFrequencyPolygonColor' => '#ff5577',
    'cumulativeRelativeFrequencyPolygonWidth' => 7,
    'fontPath' => 'fonts/ipaexg.ttf',
    'fontSize' => 24,
    'fontColor' => '#eeeeee',
    'showBar' => true,
    'showFrequencyPolygon' => true,
    'showCumulativeRelativeFrequencyPolygon' => true,
    'showFrequency' => true,
    'labelX' => 'Class (Items)',
    'labelY' => 'Frequency (People)',
    'caption' => 'Items Purchased / month(Feb 2024)',
];

$hg = new Histogram();
$hg->setClassRange(5)
   ->setData([1, 5, 6, 10, 12, 14, 15, 16, 17, 18, 20, 24, 25])
   ->config($props)
   ->create('img/ChangePropsByArray.png');
PHPコードを実行すると、次のような画像が生成されます。
Neonファイルによる設定変更と、配列による設定変更は併せて使用可能です。
また、設定項目は必要なものだけ設定すれば問題ありません。
複数回実行することで設定を上書きすることができます。
透明背景
背景を透明にするには、次のように
「canvasBackgroundColor」の項目を「null」に設定します。
<?php

require_once('../vendor/autoload.php');

use Macocci7\PhpHistogram\Histogram;

$hg = new Histogram();
$hg->config([
        'canvasBackgroundColor' => null,
        'barBackgroundColor' => '#ccccff',
        'barBorderColor' => '#0000ff',
        'barBorderWidth' => 2,
        'gridColor' => '#cc6666',
        'gridWidth' => 1,
        'axisColor' => '#aa6633',
        'fontColor' => '#882222',
        'caption' => 'Transparent Background',
   ])
   ->setClassRange(5)
   ->setData([ 1, 5, 8, 10, 11, 14, 16, 19, 20, ])
   ->create('img/TransparentBackground.png');
このPHPコードを実行すると、次のような画像が生成されます。
以上です。
- 0
- 0
- 0
- 0
コメント