前回の記事の続きです。
この記事のゴール
前回は公式ドキュメントに忠実にリダイレクトとコールバックだけを実装しました。
今回は、ログイン画面にリダイレクトへのリンクを設置し、
コールバックからのリダイレクト先のダッシュボードを設置します。
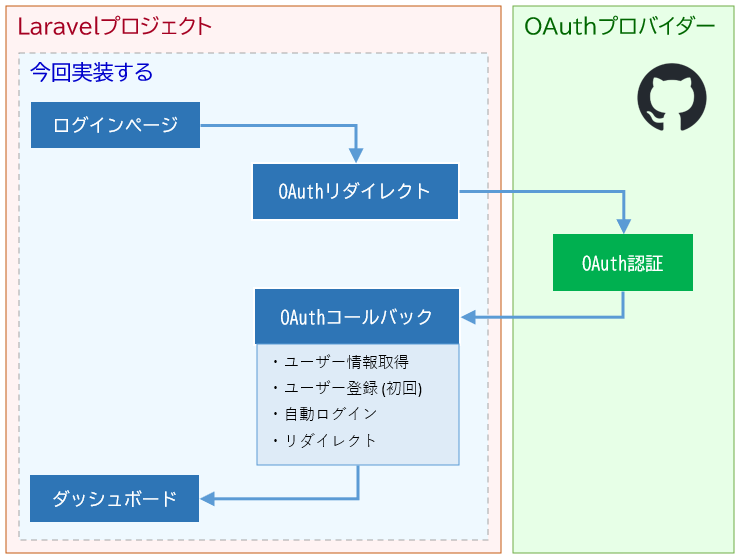
ログインページとダッシュボードの基盤はBreezeを使います。
前提条件
- Ubuntu上で作業しています
- PHP8.1以降インストール済
- Composerインストール済
- DBはSQLiteを使います
- GitHubアカウントを持っている
環境構築(Laravel10 + Breeze + Socialite)
Laravel新規プロジェクト「webapp-breeze-socialite」を作成します。
composer create-project laravel/laravel:^10 webapp-breeze-socialite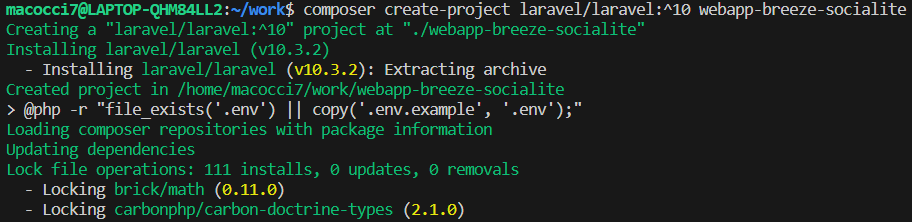
プロジェクトフォルダに入ってBreezeをインストールします。
cd webapp-breeze-socialite/
composer require laravel/breeze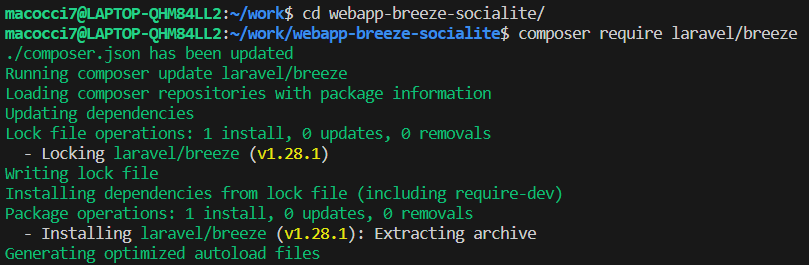
BreezeをLaravelで使えるようにします。
php artisan breeze:install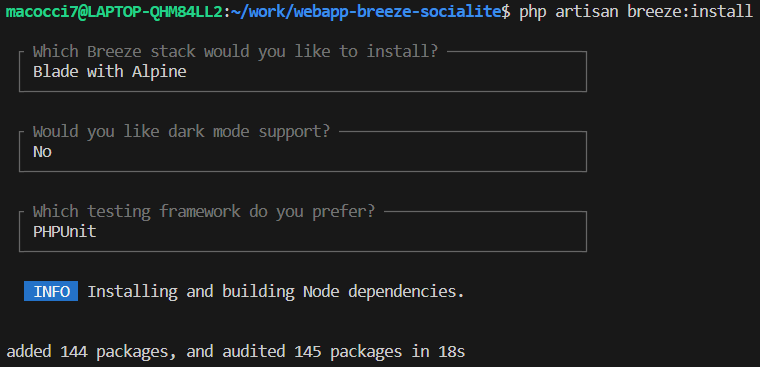
オプションを聞かれるので、ここでは筆者の趣味で
- Breeze stack: Blade with Alpine
- dark mode support: No
- testing framework: PHPUnit
を選択しています。
続いてSocialiteをインストールします。
composer require laravel/socialite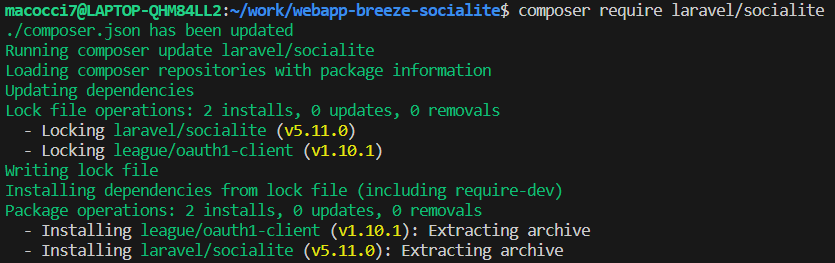
GitHubへのOAuthアプリ登録
アプリ名「webapp breeze socialite」として登録します。
GitHubへのOAuthアプリ登録は別記事にしてあります。
こちらを参照してください。
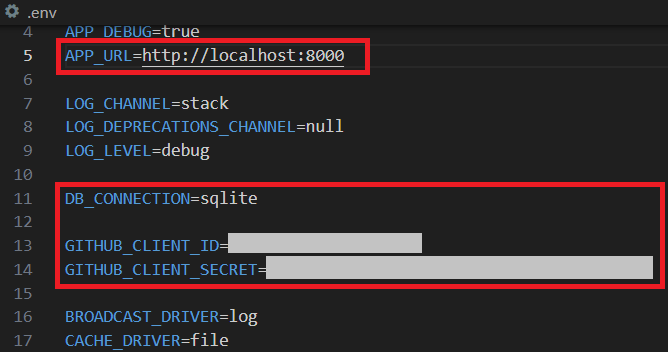
.env編集
プロジェクトトップにある「.env」を編集・保存します。
APP_URL=http://localhost:8000
に変更します。ポート番号は環境に合わせて変更してください。
DB_CONNECTION=sqlite
に変更して、他のDB項目をすべて削除します。
また、前段のアプリ登録時に取得したGitHubのclient_idとclient_secretを、
- GITHUB_CLIENT_ID
- GITHUB_CLIENT_SECRET
として追記します。
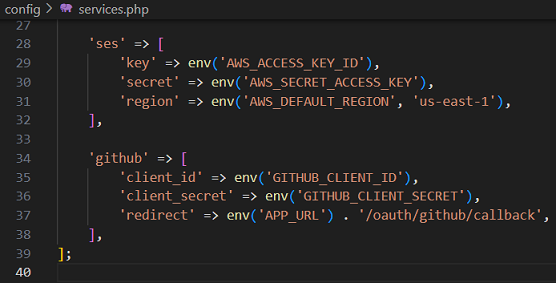
config/services.php編集
次に、「config/services.php」に追記・保存します。
    'github' => [
        'client_id' => env('GITHUB_CLIENT_ID'),
        'client_secret' => env('GITHUB_CLIENT_SECRET'),
        'redirect' => env('APP_URL') . '/oauth/github/callback',
    ],
マイグレーション
次のカラムが必用になります。
- github_id
- github_token
- github_refresh_token
今回は、これらを既存のusersテーブルに追加します。
「database/migrations/*_create_users_table.php」に追記します。
            $table->string('github_id')->nullable();
            $table->string('github_token')->nullable();
            $table->string('github_refresh_token')->nullable();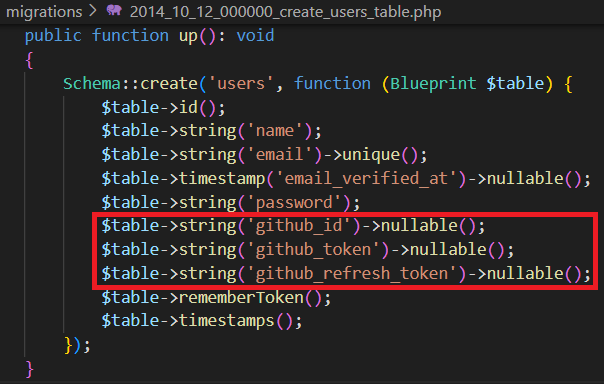
「password」カラムをnullableにする記事を見かけますが、
既存のログイン機構を使う上で「password」カラムをnullableにすべきではありません。
それはセキュリティホールを作ることと同義です。
何らかの手段でvalidation()をすり抜けられてしまうと終わりです。
セキュリティ上の防壁は何重にも張っておくべきです。
マイグレーションを実行します。
php artisan migrate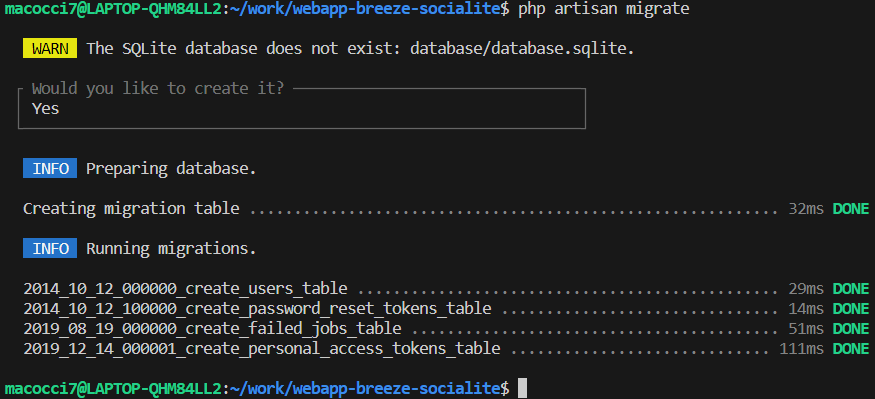
「Would you like to create it?」と訊かれるので、
[←]キーで「Yes」を選択して[Enter]キーで確定します。
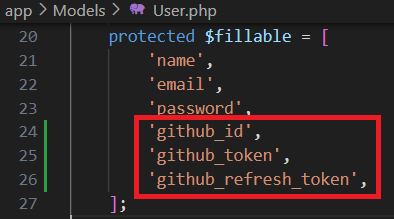
モデル編集
「app/Modesl/User.php」の$fillableに追記します。
        'github_id',
        'github_token',
        'github_refresh_token',
ルーティング
「routes/web.php」に追記します。
use Laravel\Socialite\Facades\Socialite;
use App\Models\User;
use Illuminate\support\Facades\Auth;
use Illuminate\Support\Str;
Route::get('/oauth/github/redirect', function () {
    return Socialite::driver('github')->redirect();
})->name('oauth.github.redirect');

Route::get('/oauth/github/callback', function () {
    $githubUser = Socialite::driver('github')->user();
    $user = User::updateOrCreate([
        'github_id' => $githubUser->id,
    ], [
        'name' => $githubUser->name,
        'email' => $githubUser->email,
        'password' => Str::random(40),
        'github_token' => $githubUser->token,
        'github_refresh_token' => $githubUser->refreshToken,
    ]);
    Auth::login($user);
    return redirect('/dashboard');
});
※公式ドキュメントでは「password」の生成はありませんが、
セキュリティ上の理由によりnullableにするべきではないため
推測困難な長いランダム文字列を生成しています。
▼完成形は次のような感じです。
<?php

use App\Http\Controllers\ProfileController;
use Illuminate\Support\Facades\Route;
use Laravel\Socialite\Facades\Socialite;
use App\Models\User;
use Illuminate\support\Facades\Auth;
use Illuminate\Support\Str;

Route::get('/', function () {
    return view('welcome');
});

Route::get('/dashboard', function () {
    return view('dashboard');
})->middleware(['auth', 'verified'])->name('dashboard');

Route::middleware('auth')->group(function () {
    Route::get('/profile', [ProfileController::class, 'edit'])->name('profile.edit');
    Route::patch('/profile', [ProfileController::class, 'update'])->name('profile.update');
    Route::delete('/profile', [ProfileController::class, 'destroy'])->name('profile.destroy');
});

Route::get('/oauth/github/redirect', function () {
    return Socialite::driver('github')->redirect();
})->name('oauth.github.redirect');


Route::get('/oauth/github/callback', function () {
    $githubUser = Socialite::driver('github')->user();
    $user = User::updateOrCreate([
        'github_id' => $githubUser->id,
    ], [
        'name' => $githubUser->name,
        'email' => $githubUser->email,
        'password' => Str::random(40),
        'github_token' => $githubUser->token,
        'github_refresh_token' => $githubUser->refreshToken,
    ]);
    Auth::login($user);
    return redirect('/dashboard');
});

require __DIR__.'/auth.php';
※(2024/02/20一部修正):
'password' => fake()->regexify('[A-Za-z0-9_\-\+\@\!]{8,16}'),の箇所を
'password' => Str::random(40),に修正しました。
fake() はテスト用のメソッドであり、本番環境用に実装するものではないためです。
この実装のために
use Illuminate\Support\Str;を追記しています。
コンポーネント作成
GitHubへリダイレクトするURLへのリンク表示用のコンポーネントを作成していきます。
「resources/views/components/」フォルダ内に
新規ファイル「oauth-github-link.blade.php」を作成します。
<a
href="{{ route('oauth.github.redirect') }}"
class="inline-flex items-center ms-2 px-4 py-2 bg-gray-800 border border-transparent rounded-md font-semibold text-xs text-white tracking-widest hover:bg-gray-700 focus:bg-gray-700 active:bg-gray-900 focus:outline-none focus:ring-2 focus:ring-indigo-500 focus:ring-offset-2 transition ease-in-out duration-150"
>
<img src="/img/github-mark-white.svg" width="18" height="18" alt="logo" title="GitHub Logo"/>
Use GitHub
</a>
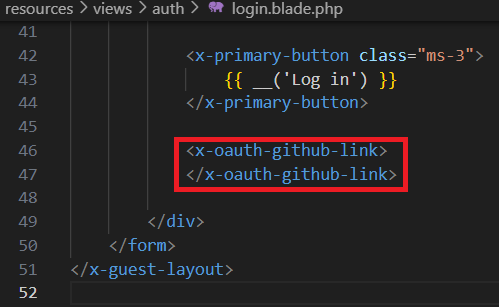
ログインページBladeテンプレート編集
前段で作成したリンク用コンポーネントを差し込んでいきます。
「resources/views/auth/login.blade.php」に追記します。
            <x-oauth-github-link>
            </x-oauth-github-link>
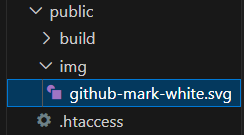
GitHubのロゴ設置
前段で設置したリンクに表示するGitHubのロゴを公式サイトからダウンロードしてきます。

「public/」フォルダ内に「img/」フォルダを作成して
その中にロゴ画像をコピーします。
WEBサービス起動
LaravelのWEBサービスを起動します。
php artisan serve
ブラウザ確認
WEBブラウザで
http://localhost:8000/にアクセスします。
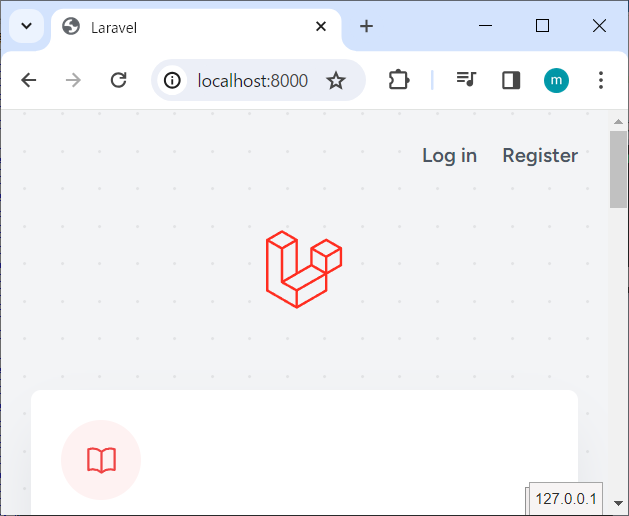
LaravelデフォルトのWelcomeページが表示されました。
Breezeによって右上に「Log in」「Register」のリンクが設置されています。
「Log in」のリンクをクリックしてログインページに移動します。
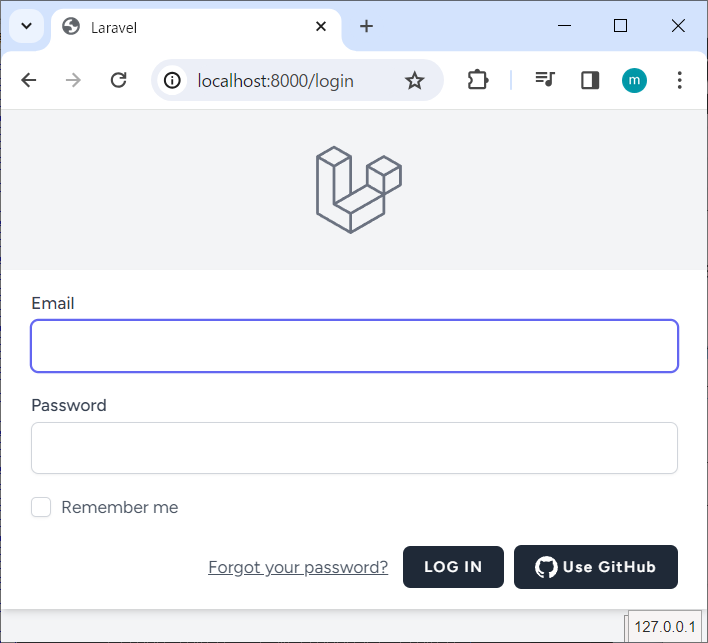
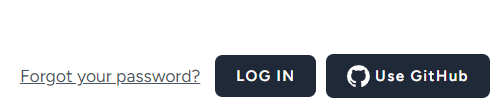
画面右下にGitHubのボタン(リンク)が表示されました。
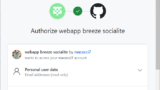
「Use GitHub」のリンクをクリックします。

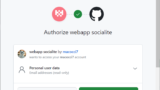
GitHubのOAuth認証画面が表示されました。
「Authorize …」ボタンをクリックします。
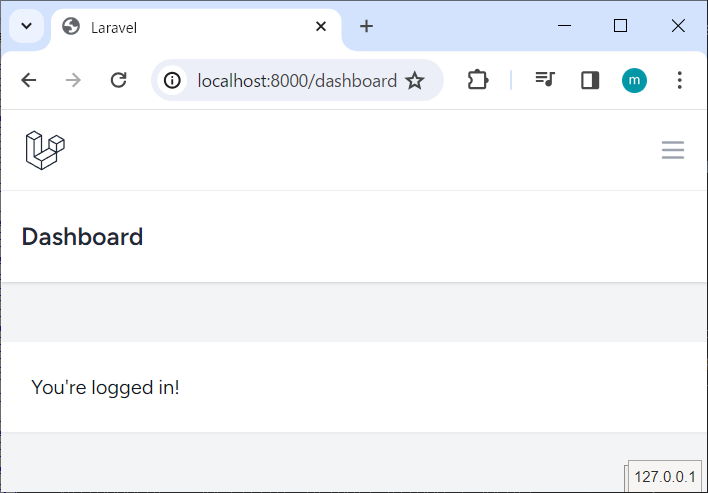
ログイン後のBreezeのダッシュボードに転送されました。
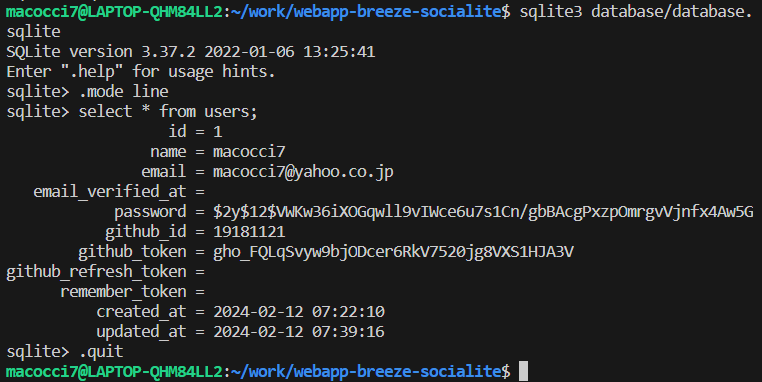
DBのusersテーブルのレコードを確認してみます。
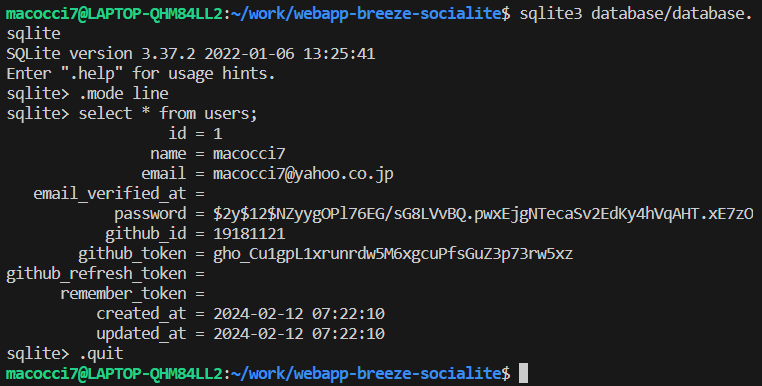
ユーザーレコードが作成されています。
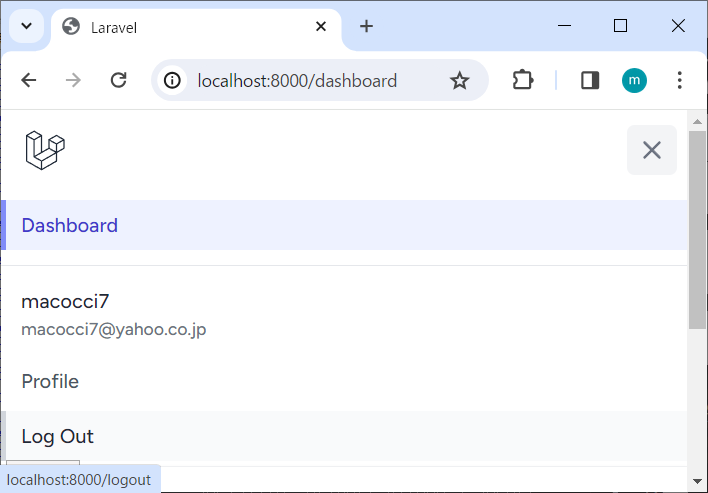
ダッシュボード右上のプルダウンメニューから「Log Out」を選択します。
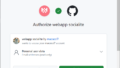
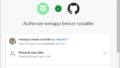
再度ログインページを開き、「Use GitHub」リンクをクリックします。
今度はGitHubのOAuth認証確認ページが表示されることなく
ログイン後のダッシュボードへ転送されました。

DBのusersテーブルのレコードを確認してみます。
レコードが更新されています。
今回は以上です。お疲れさまでした。
続きはこちらです。
- 0
- 0
- 0
- 0
コメント